Are you looking to use above-ground pool kits do it yourself to build an above-ground pool?
Great decision because an in-ground pool might cost you a fortune. Above ground pool is a huge convenience for any homeowner. Regardless of the pool’s size, this guide will help you sort out different things associated with the project.
You should understand the basic installation process of these models. Installation of an above ground pool can be done quickly only if you are ready for your entire project beforehand. From there, it will be all about assembling.
So, keep reading to find out more about above ground pool kits do it yourself projects.
How to Install Above Ground Pool Kits Do it Yourself
Have you ever thought about going for an above ground pool kit do-it-yourself? It’s time to stop thinking and start acting because we will list everything you need to do in the entire process.
Where should I begin the installation process?

You have to be watchful from where you should start the installation process. It would be better to organize your pool parts and tools and find an important location to place your above ground pool.
The area needs to be large and flat and should be inside your yard. If the pool size is oval, there might be buttresses on either side, and they will add 2 to 3 feet of space to the overall size.
Before you start with the digging, make sure whether there are any utility lines or obstructions under the ground or not?
You will also have to see whether your installation is compliant with the local building codes or not? You will have to keep in mind that don’t assemble your pool on tar, asphalt, or oil-based surfaces.
There are some things to avoid here when installing your above-ground pool kit.
- Gas lines.
- Electrical lines.
- Cesspools.
- Drywalls.
- Septic tanks.
- Sudden slopes.
- Buried debris
- Stumps and tree roots.
Measurement of the location for installation
After gathering all the tools, it’s time to take measurements of the pool area where you are going to install it. To find the center point, you have to measure something that is already existing in the area, such as a fence or wall.
Measure half the width of the pool and apply the tape to mark it. The best practice is to pull your measuring tape as per the radius measurement with an extra foot. This will provide you with some cushioning against any error.
Clear the area for installation
You have to make sure the installation area is entirely free from any berberis, rocks, roots, or sod. If you are removing substantial grass areas, it would be better to rent out a sod cutter from your nearest hardware store.
Level down the ground
You have to make sure the ground leveling has been done before you start the installation process. You can use a leveler to assess any highest or lowest points. Dig down from there and build up the lower areas to maintain a straight level.
Rim assembly on the bottom wall
It’s time to connect each of the rails to their bottom plates. You will need your pool parts here to separate all the components and get that checklist to see whether everything is there or not. Take the rails with curved bottoms and place them within a circle around a pool area’s circumference.
Now assemble the rails by using the cuffs or plates and join them together. You can see the checklist whether the kit has resin cuffs, resin plates, or conventional bottom plates made of metal. You must insert the rails into the bottom plates right up to the stops on the plates.
Patio blocks installation
For some additional support, you have to install the patio blocks within each of the bottom plates. You will have to center each of the bottom plates on the patio block.
Now, sink these blocks into the ground, and all these blocks need to be leveled. Now repeat this step around the frame and ensure that all blocks should be flush with the ground.
Pre-assembling
At this stage, you need to go for any pre-assembling of the uprights in your kit. Your installation process will become much easier if you align all the uprights with each other. Leaning them against a fence has to be done.
Most of the uprights can be identified with an additional hole in the middle. You can conveniently align those holes and keep them hooked. Now place the top plate on the upright to align the holes while the hooked part is juxtaposed with the open end.
But don’t install the screws in those two side holes right now. You can do that later as it will be easier for you in the installation process.
Wall installation
The next step involves wall installation, and it can be a bit tricky. You have to locate the area where you want to put the skimmer and allow it to return to start the wall behind the upright. It is better to use landscaping stakes to support the wall as you connect the bottom track.
If you end up with the sidewall being too long or too short, it’s better to make the bottom ring smaller or larger by sliding the rials out or in from the plates. In case the ground is not level, the wall will jump out of the track at the bottom. Therefore, make the necessary changes to the level.
Installation of the upright
You need to install these uprights into each cuff or plate at the bottom. Bottom cuffs don’t need anything, while bottom plates need the installation hardware.
You will have to check your kit’s instruction manual to see what it comes with. When you are done with the upright installation, it’s time to check the pool for its proper shape. Check to see if the diameter is accurate in all directions.
Cove preparation
The next step is cove preparation. If you are looking to build a long-lasting cove, then it’s better to go for a coving kit specially designed for above ground pool kits do it yourself. It will assist you in eliminating any guesswork by using sand. You can create a perfectly smooth cove right around your pool corner.
If you are going for sifted sand or earth, you must build a 6-inch to 8-inch high pool cove within the metal wall throughout the circumference. Your liner won’t creep under the wall, and it will remain safe from any metal edges of the pool.
Now when the cove is in place, it’s time to tamp and rake the pool area, so no sand should be there on the area above the cove. It might result in any pinholes within your liner. If you wet the sand with water, it will take tamping a lot easier and keep the sand packed.
Installing and hanging the vinyl liner
If you are looking to install stabilizers to keep them all holding up, you must take them out when installing the liner. Make sure not to place the wall seam if the liner right over the skimmer or its return cutouts.
It would be better to remove your shoes and place the line right at the center of the pool. At this point, the flap of the seams needs to be facing down. You must spread the liner so that the bottom seam is resting on the cove throughout the pool. This seam shouldn’t be shifted to one side and should be on the wall.
Such conditions will create stretching and tightness in the liner when you are filling your pool. There are three types of liners: overlap liners, beaded liners, and uni-bead liners.
Overlap liners hang over the wall, and you need to make sure that their seam is straight up or straight down. You can secure them with plastic strips for coping.
Beaded liners don’t need these strips, and you will receive a tracker that you must install around the pool. This bead receiver will avoid any future problems for you.
And then there are uni-bead liners that also don’t receive any coping strips. There is a welded V-Band on the top of the wall. Just open the bead using your fingers and directly hang it on the pool wall.
Adjustment of the liner and inner stabilizer
As the liner is secure, pull the wrinkles within the floor from the sidewall evenly. This will leave the wrinkles right at the coving. Make sure there is no air between the ground and the liner.
When your liner is fully adjusted, and your copings are secure, pull your first inner stabilizer right over the plastic coping to fit it snugly. Leave one end of the stabilizer raised slightly so you can put it in the next stabilizer.
Secure uprights and attach the top rail
Pull the front top plate right over the stabilizer and add those final screws to secure the uprights in their place. Keep using the leveler to make sure everything is okay. Now attach the top rail that will either be made of resin or metal and come with its hardware. It’s time to fill it with water and enjoy your above-ground pool.
Do It Yourself Above-Ground Pool Costs
Wondering how much above-ground pools cost?
The above ground pool kits do it yourself vary in terms of costs. Some of them are more economical models while others can be far more luxurious styles. Most people go for convenience and affordability when choosing these pools.
Size is another factor that can determine what will be the cost of your pool as well as your pool’s location. There are a couple of pricing components here that are at play. These two components are the kit itself and its installation.
Most of the companies only sell kits and don’t include their installation. The cost will vary from $1500 to $4500 based on the materials’ quality and construction in such a scenario. With more metal, the price will go up, and the pool will become more durable too.
Installation costs range from $1000 to $3000 based on the size of the pool. Oval-shaped pools cost more as compared to round pools, and their kits are expensive as well.
Ground preparation for the installation will also add more cost, especially if it is not leveled properly. In some areas, you might also need a permit for the installation of an above-ground pool.
Do It Yourself Above-Ground Pool Types
How many types of above-ground pools are there?
You’ll find different types of above ground pool kits do it yourself to build pools. But based on the materials, there are 3 types. There are all-resin pools, all-metal pools, and hybrids. All three of them come with metal walls and a vinyl liner.
The variety comes in caps, posts, and ledge. These will be made of metal in all-metal kits, made of resin in all-resin kits, while the hybrid kits may have a combo of either metal or resin posts, caps, and ledge.
All three of these types are excellent in terms of quality, but the metal one will generally last longer. But if you are looking to run salt water in your pool, you need to go for the all-resin pool. But if that is not the case, you can go for the all-metal variant as well.
Do It Yourself Above-Ground Pool Problems
What are the most common problems with these pools?
Cloudy, green water, and filter issues are the most common problems here. Green water is caused by algae production in your pool due to a drop of chlorine content in your water. Test your water to confirm this and shock the algae to kill it. After that, you will have to remove all the dead algae from your pool with a vacuum.
And then there is the cloudy water problem caused by the buildup of bacteria within your pool. The cause here is again very similar to the previous problem. It is caused by a drop of chlorine content in the water, and you will have to add necessary chemicals into the pool water to make it clear.
Your pool filter might also get clogged after regularly skimming the water. Therefore, if you do heavy pool use, then you must also clean the filter regularly. Heavy pollen or blossoms can fall into the pool and make it tough for the filter to function properly.
FAQ
Can you make an above ground pool look nice?
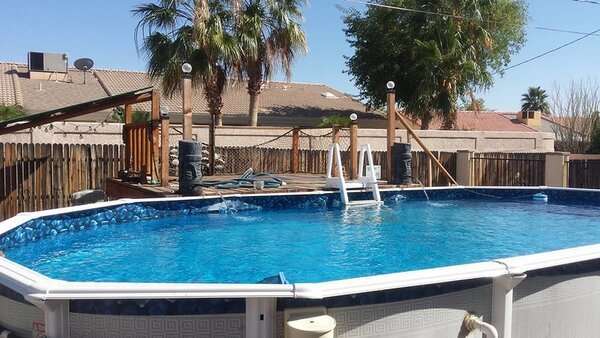
You have to give some attention to details around the pool. Your above-ground pool will not look great if you don’t install a deck around it. With a proper deck and some decorative arrangements, you can make it look as good as an in-ground pool.
What is the best thing to put around an above-ground pool?
You can place pavers or concrete, especially on concrete patios, because they are easy to maintain and care for. Rock and gravel are a good choice too planters, and trees are great options if you have enough space available around your above-ground pool.
Can you fill an above-ground pool at night?
Yes, you can allow water to fill the pool at night on its own. But you will have to do the stretching, and the liner should be tight against the wall. There should be some air gap right between the wall and the liner in some areas too.
How many years do above-ground pools last?
On average, these pools can last anywhere between 7 years to 15 years. The liners will last around 5 years to 9 years. All metals can covalently last way more than all-resin models or hybrids.
Conclusion
The installation of above ground pool kits do it yourself is simple if you follow the instructions carefully. There are different types of these pool kits, and you need to choose one according to your needs and preferences.
Also, keep in mind to take care of your pool and keep its water clean to make sure you don’t have to deal with any mess at all. After all, you and your family want to enjoy a nice and clean pool environment throughout the summer.
Featured Image from Flickr © Miah Mclntyre – The original image was not changed