
DIY fashion accessories are something that we are all attracted to. However, being fashionable requires a lot of effort, money, and time that’s why you need to turn in DIY fashion accessories. Now that the weather becomes warmer and warmer, it is time to re-fill the wardrobe with some new fashionable accessories. It is the time of the year that you usually need to upgrade your wardrobe with all the latest trends, but what happens when you don’t have enough savings?

However, you can be ready to set and hit the new season with all the latest trends if you create everything yourself. There are plenty of easy DIY fashion accessories you can make with no effort and only a few materials. The DIY fashion accessories you will find on the list below require only simple materials that you can find easily at any place, even your house.
So are you ready to do some work and become a fashion freak? Although DIY fashion accessories are amazing for your wardrobe, they can also give you plenty of extra cash if you sell them. There are plenty of websites like Etsy, eBay, and Amazon that you can sell your craft. Another excellent place for selling handmade products is through a professional Instagram and Facebook page. People, especially women, desperately looking for new fashion pages to buy handmade products, so why don’t you turn into their supplier? Try to go with personalized options, and you will definitely sell like crazy.
Get some inspiration from the list below, and create your business with the most amazing DIY fashion accessories.
Bobby pin earrings as DIY fashion accessories
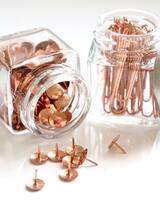
What is a better fashion accessory than long handmade earrings? Women love long earrings are they can decorate and change every outfit. Imagine having a casual outfit with jeans and a white shirt, making a ponytail on your hair, and adding the bobby pin earrings. Is it amazing?
Supplies you need
- Bobby pins
- Three nail polish colors
- Wire cutters
- Construction paper
- Earring hooks
- Chain
Step by step guide to follow
Step 1
Place 14 bobby pins on the table. You will need seven pins for each earring. Choose a nail polish color of your choice and paint all the top half of the bobby pins.
Step 2
Grab the second nail polish and paint the remaining bottom part of the bobby pin. It doesn’t matter if the lines are not straight and they seem a bit messy; everything will be fixed while you continue the craft.
Step 3
Let the bobby pins dry completely for about an hour. Do not touch them at all if you think that they are still a bit wet.
Step 4
Now, take the first nail polish you used and paint the top edges of the bobby pins. It’s also time to paint all the back sides of the bobby pins and let them dry completely.
Step 5
If you want to make something more glowing, grab a gold nail polish and paint the spot that the two colors are met. If you don’t want a glowing result add any color you like. Don’t forget to let it dry completely before you continue with the craft.
Tip: Use some tape to create smooth lines.
Step 6
Slide the bobby pins of the paper. The nail polish helps them stay together. It’s up to you if you want to paint the black bottom or leave it like this. However, if you go for it, be careful not to paint the top and destroy your colors.
Step 7
Time for your chains. Grab a chain and cut it for about 5 inches. You can easily cut the chain by using wire cutters. Place both the ends of your chain in the bobby pins and link them together.
Step 8
Close the clasp and attach an earring hook to one of the chain links.
Step 9
Repeat the whole process for the second part of your earring.
The best part of this project is that you make recycled earrings! Go for any color that you like and don’t be afraid. It is a cheap craft that you can build at zero time. Try to find the best color combinations and go for it.
Leather bow hair tie

This faux leather bow hair tie is one of the quickest projects that you can make, and of course, it requires no sewing. The leather bow hair tie is cute, and every woman wants to have it on her collection. You can go for any color you like; there are no restrictions. Choose more friendly and pale colors, like pink, when it is a girl’s order, but you can go for a pale brown, black, or grey when it is made for a lady.
Supplies you will need
- Faux leather at a color of your choice
- Clip
- Hairband
- Bow patterns (there are plenty of bow patterns to go for, so choose the one you like the most)
- Needles
- Scissors
Step by step guide to follow
Step 1
Pin the bow pattern above the leather piece and cut the leather in that shape by using your scissors. Try to be as sharp as possible in order to create a great bow.
Step 2
Unpin the pattern, and your bow is ready. Now take a hairband, pass the leather bow inside and tie it onto the hairband in order to secure it and create the bow shape on your hair tie.
Step 3 (Alternative way)
If you don’t want to go with a hairband, you could just tie the leather bow together, create a knot in the middle and then add a clip on the knot. By using that way, you make a more girly hair tie that kids love.
The leather bow hair tie is ready to use or even sell it. Do you think that there is any more straightforward craft than this? It can be done in five minutes and used directly. If you ever run out of hairbands, grab some leather and take action.
Of course, there are many other ways to create some leather bow hair ties, but this is the quickest and easiest one.
DIY fashion accessory leather clutch
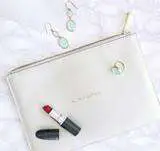
It’s ok to love the giant bags that can easily carry out everything, but you should also be prepared for any occasion. A small leather clutch is suitable to carry it from morning till night. It is a beginner project that anyone can easily do without many materials. However, buying an envelope clutch is most expensive than purchasing a big regular bag. So why don’t you create your own?
Supplies you need
- Two colors of faux leather of medium stiffness
- Clutch template (you can even download it from the internet)
- Hole punch pliers
- Knife
- Wax thread
- Metal ruler
- Cutting mat
- Yarn needle
- Small clumps
- Twist-lock purse lock
Step by step guide to follow
Step 1
Print the clutch template and cut out your paper in this shape. Find the right side, from either the main body or the top side, and place it onto the wrong side of your leather pieces.
Step 2
Use the knife and the metal ruler to cut out the leather sharply on the correct shape. On the main body of your leather section, paint a dot every 1/4″. Dot on both the top edge and along the left and right sides. Now, grab the hole plier pincher and punch a hole on each dot.
Step 3
Fold the two sides inward and fold the bottom flap upwards on top of the side flaps. You can use the small clumps to hold it in place. Take a thin marker and mark on the side flap underneath the hole. Punch those marks with the plier, and repeat the same process for the top flap.
Tip: The template shows you exactly the lines you need to follow.
Step 4
Instead of sewing, grab the medium waxed thread, thread it in the needle, make a knot at the edge of your thread and start sewing the holes. To avoid creating any gaps, sew back through the opposite holes again once you reach the end. In the end, make a knot from the inside of the last hole.
Repeat the same process on all sides.
Step 5
Now that your clutch is assembled, it is time to add the twist-lock purse lock on the top flap, right at the end of the middle corner. The exact placement depends on the size and shape of the lock you chose. In order to install it, you only need a knife to cut the holes and a screwdriver to secure it on the flap.
Your leather clutch is ready to use or maybe sell on your marketplace. It is a marvelous craft that women love. If you decide to sell it, price it a bit less than the clutches in the market, and it will be invaluable. Go with personalized options when it comes to the leather colors and the locks. Are you ready for crafting?
DIY bikini top

It may seem difficult to make your own swimsuit, but it is actually not that hard. Bikinis are a must for the summertime, but it is quite expensive to buy them. So why don’t you learn some patterns to make them?
Supplies you need
- Two pieces of fabric at a color of your choice (you can even choose colorful fabrics)
- Straps
- Scissors
- Loop-turner
- Sewing machine or needles and thread
- Foam cups
Step by step guide to follow
Step 1
Grab your fabric and cut it into triangular shapes. Remember to cut two more pieces for the lining. If you are going to create an adjustable top, cut the corner of the lining pieces.
Step 2
Add some elastic in both triangle sides to make it secure and tight. Bikinis should be highly secure in order to avoid any accidents on the beach. When you add the elastic, make sure you grab both the layers of the fabric (main and lining fabric). For a better final fitting, you need to stretch the elastic while you are sewing or threading it.
Step 3
Close the straps by serging them or by making zig-zag stitching. To close the straps correctly, you need to fold them in half vertically. Fix your settings to take only 1/4″ from the raw edges. Then use a loop turner and turn the straps inside out.
Step 4
Fold the triangle’s top, pin it on the center, and pass the straps to create the neck.
Step 5
Repeat the process for the second triangle.
Step 6
By using the loop-turner, insert the chest strap on both triangle pieces and make knots at the end of each side of the straps.
Step 7
Now insert the foam cups through the holes at the side of the triangles.
And here is your bikini top! Are you ready to rock on the beach by wearing your own masterpiece? Bikinis are always in fashion, and women love its timeless value. By creating such a cheap craft and sell it online, you can create a whole new business. Make your website visible in all the summer countries, and it will become a trend. Try to learn more patterns and shapes to follow, and you can become a king of summer.
Save yourself from the agony of shopping and create your own affordable DIY fashion accessories. The main advantage is that you will save a lot of money, but you can also earn some extra money by creating an e-commerce business with your craft.
Turn into a fashion freak that is always wearing the latest trends! Become a fashion icon with your own crafts and influence other women, to follow you. It is not that hard as you imagine; the only thing you need is some cheap materials and a lot of patience.
If you love reading this article, why don’t you try reading “DIY handbag ideas to make and sell” and add an addition to your new business?