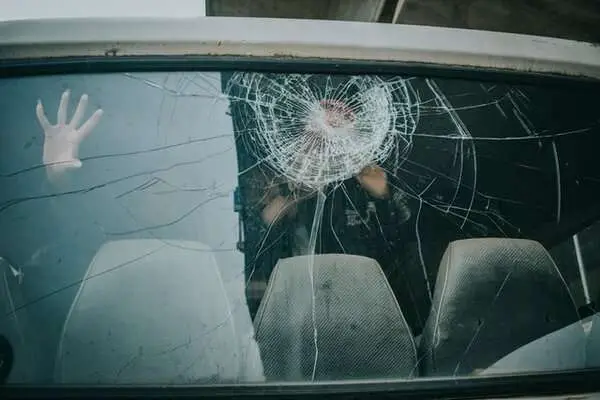
Have you chipped your windshield on your last drive and looking to repair it on your own? This do it yourself windshield repair guide will sort things out for you in no time.
Chipped windshields might not influence your vehicle performance. But they do create a disturbance in your view. Of course, no one wants to drive a car with a chipped windshield. It can cause an injury when you are cleaning the glass, or it might cause a leak as well over time. They sure don’t look that great either on your screen.
Let’s have a detailed look at this matter and see how you can resolve it independently.
Types of Windshield Cracks

So, how many types of windshield cracks are there? There are different types based on what has hit your windscreen. Sometimes it’s just a chip, while at other times, you might have to deal with cracks as well.
There are so many types of these cracks. There are stars, bulls-eyes, chips, cracks, and different combinations as well. Each of them needs a slightly different technique to fix. Let’s have a brief look at all these types one by one.
Cracks
There are three different varieties of these cracks. There are stress cracks that can occur not from direct impact but repeated impacts over time. These can also occur with extreme cold or heat.
There are edge cracks that can extend to the center of the glass. And then, there are floater cracks that can be around a couple of inches in size from the windshield edge and extend with extreme cold or heat.
Chips
These occur due to different debris impacts on the windshields and occur with a small divot. You need to repair these chips as soon as possible, or they can turn into cracks.
Bullseye
These are bullseye-shaped chips, and when they occur, the windscreen glass looks like a crater, and there are concentric circles coming out of the central divot.
Stars
When a chip has multiple tiny fissures coming out of the center in a starry pattern, it is called a star crack. These cracks are easier to repair with glass fillers.
Combos
Combo cracks are usually a mix of different cracks. They occur after multiple impacts, and a replacement becomes mandatory for the integrity of the glass. Some of them are pretty large ones as well. They can span the entire windshield, so you need to replace them immediately.
How to Fix a Crack in Your Windshield – Step by Step

Thinking about do it yourself windshield repair? This section will list some necessary steps to fix that annoying crack in your windshield. But first, you need to address the issue of how big a crack is to repair on your own.
The rule of thumb for you to follow is that the cracks larger than three inches and the larger chips than a quarter-inch should be fixed with a do it yourself windshield repair technique.
Here are some practical steps that you need to take to get the job done.
● Applying the adhesive
You need to begin by peeling off that paper backing on your adhesive patch for exposing a side of the adhesive. Ensure the chip is no bigger than that circular cutout present in the middle of the patch. Now center the patch right over the chip and apply it for cleaning.
But make sure the dry side is facing outside of the windshield glass. Peel off the other side and apply it to the pedestal. The pedestal is a molded plastic piece featuring a tube that is angling upward. Then line up all the tabs so you can remove them easily.
● Mixing the resin
Mix your resin and pour the liquid into that pedestal. You need to fill it to the top. Make sure to compress the syringe down and insert it firmly right into the pedestal.
With one hand, hold the pedestal and pull up the syringe plunger with your other hand. You don’t need to worry because it won’t draw up your resin. You can continue drawing up your syringe till you reach the end of its length. Some syringes also feature a clip for stopping you from accidentally removing the syringe.
Moreover, drawing up the plunger will create a vacuum that will take the air bubbles out of the syringe and away from the chip you are working on. You will also notice the same as the bubbles are leaving the chip.
Some kits can only take a couple of minutes, while others can take up to 10 minutes. But make sure all the bubbles are gone and don’t proceed to the next step.
● Forcing the resin into the chip
The next step is to hold the pedestal with one hand as you remove the syringe with your other hand from the pedestal. It’s time to insert the syringe again and slowly push the plunger down. This will force the resin into the chip. You need to stop pushing about halfway down or where the clip stops your syringe or as per the instructions given.
● Freeing any trapped air
You need to free any trapped air within the chip, and for that, you have to remove any tint on the window and then knock it gently. If there is a small space within the crack or chip that is not filled, you can further push your syringe down. But be careful right from the beginning.
● Let the resin cure
Now you need to allow the resin to cure, and for that, you can reference the instructions and see for how long you need to keep the resin just the way it is so it can cure completely. Once it is completely cured, you can remove the pedestal as well as the adhesive patch.
● Don’t need to wipe anything just yet
When you remove the patch and the pedestal, just keep in mind that you don’t need to wipe anything just yet. You must wrap your resin tube and put a couple of drops right on the crack or chip. Now grab your curling strip and place it right on top of the chip with a couple of drops of resin.
Now place it down at an angle so that you can avoid trapping any air bubbles. You need to hold the strip using your fingers as you see that razor blade for getting those air bubbles out. After that, you can allow it to cure for the time that is recommended in the instruction.
● Use a razor for scraping the strip
You have to use a sharp razor blade for scraping off your curing strip. And make sure you don’t just pull it off. Just place your finger right on top of your chip and use a razor blade to break the bond between the glass and the strip right around the perimeter of that crack.
You finally have to twist the trip off and make sure not to pull it out, or you will risk pulling out the resin along with it from the crack as well. Scraping should be done perpendicularly to the windscreen glass to remove any resin that is left behind.
How to Repair Windshield with Household Items

Does your car have a windshield chip on it, but you don’t want to spend on it for the repair? Well, don’t worry, because you have all the tools right in your home for the do it yourself windshield repair without going anywhere.
You need to keep in mind this do it yourself windshield repair is temporary, and you will have to take your vehicle to a professional. So, what are those household items that you can use for do it yourself windshield repair?
Do it yourself windshield repair with nail polish

If there is a small chip or a crack in your windshield, you can use nail polish to remove it. But make sure you are using clear nail polish for this purpose.
Just pull your car right under the shaded area because you don’t want your nail polish to dry out too quickly. Now clean your windscreen properly and make sure there is no debris on the surface. Use enough nail polish to cover the crack.
Just smooth out the outer area of the crack and make sure it goes with the windshield surface. Evenly coat the polish on the impacted area. You can fill it deeper if the damage is deep. After doing all that, you need to take your car out in the open sun and allow it to dry quickly.
Do it yourself windshield repair with Crazy Glue
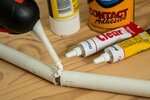
Another way of doing it is using the Crazy Glue. You can begin by parking your car under a shade. Use a pair of scissors to open the glue and have cotton swabs and gum remover around as well. Make sure you don’t get any glue anywhere you don’t want it because it’s incredibly difficult to remove.
Apply the glue with a cotton swab to fill the area if needed. If there is an extra glue you need to remove, use another cotton swab. Allow the glue to dry completely. It will take a few hours, and you can clean it with your glue remover.
Do it yourself windshield repair with your mix
You can also create your mix and use it as an adhesive. You will need water, rubbing alcohol, salt, a sponge, and bug repellent. This process will take a bit longer, but it will get the job done pretty well.
You need to take half a cup of water and a tablespoon of salt along with a tablespoon of bug repellent and a tablespoon of rubbing alcohol and make a mixture within a bowl. Make sure all the salt is dissolved. Take a sponge and submerge it within this solution. Now take it out and apply it to the crack.
Allow your crack to dry for about two to three hours. If the crack is visible, you need to repeat the steps by dipping it in the mixtures and applying it to the crack. Keep doing it until the crack is completely gone.
Risks of Driving with a Cracked Windshield
You might be wondering why can’t you drive around with a cracked windshield? Is it not obstructing the view? But there are some risks involved here, even if the crack is not directly obstructing your view as a driver.
- You might get a ticket for it if the officer deems it unsafe for you.
- Extreme cold and heat can further worsen a windshield crack, and you might have to spend a lot more to get it fixed.
- With a cracked windshield, your car is much more vulnerable to any road impacts. Even the slightest impact can break the glass and cause you an injury while you are driving.
Windshield Repair vs. Windshield Replacement
So, how to decide whether you should go for a repair or a replacement? Do it yourself windshield repair can be easy and simple, but there are times when you need to replace your windshield for good.
A repair can be cost-effective and quick, but the crack should be small enough for it. Chips smaller than a quarter-inch and cracks that are smaller than three inches are better suited for repairs.
Anything bigger than that needs a complete windshield replacement because it’s not safe for you anymore. You can also take your car to your local workshop and have it examined by a professional.
FAQ
Does do it yourself windshield repair work?
Yes, it does work, but it’s a temporary solution if the crack is too big. If the crack is not that big, your do it yourself windshield repair can last for an extended period.
How big can a crack in the windshield be repaired?
If you are looking for a do it yourself windshield repair, any crack smaller than 3 inches and a chip smaller than a quarter-inch can be easily repaired. Cracks bigger than that need professional work. Some cracks and chips are beyond repair and need full windscreen replacement.
Will Super Glue fix a cracked windshield?
Yes, temporarily, super glue can fix a cracked windshield, and so can nail polish. But you will eventually have to get it fixed by a professional.
What kind of resin is used for windshield repair?
Diamond clear resins are the best and considered to be industry standard for the process of windshield repair and bonding.
Conclusion
So, are you up for a do it yourself windshield repair or not? One thing’s for sure that these repair works can be extremely beneficial for you and can buy you some time to get your windshield fixed by a professional.
If you do it properly, you will end up with amazing results, but make sure you get it fixed by a professional at some later stage because the repair works that you will do on your own are only temporary.