Are you looking for a smart and inexpensive way to boost your garden’s aesthetic appeal? While you can always opt for more plants, outdoor furniture, and garden ornaments, perhaps, it’s time to get creative and personalize your walkway with DIY garden stepping stones.
That’s right. Personalized garden stepping stones are growing quite popular on Instagram and gardening sites, especially since the pandemic, during which millions of people seized different home improvement opportunities to upgrade their home’s curb appeal. Since these attractive hardscape elements serve as much a utilitarian purpose as much as an aesthetic one, many homeowners have revamped their gardens and walkways with them – killing two birds with one stone.
However, there’s more to making stepping stones than picking and placing slabs of natural rock to create a path (although that works too). If you’re looking for a more fulfilling DIY project, keep reading as we’ll share what a stepping stone is, its benefits, and how to make garden stepping stones.
What is a Garden Stepping Stone?
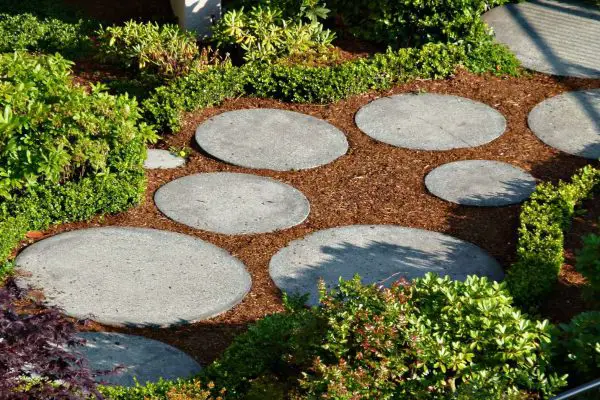
Garden stepping stones are essentially a set of large stones arranged to form a path or walkways that allow homeowners and other pedestrians to cross a garden without stepping on the grass or other plants. Traditionally, these stones were simply used to lead people to and from certain areas of a garden, such as ponds, trees, pools, or garden furniture. However, modern stepping stones are popularly used as outdoor décor and come in a variety of shapes, sizes, designs, and colors, making them as much a visual interest point as they are functional.
Benefits of Garden Stepping Stones
The following are some fantastic benefits of garden stepping stones you can learn to further fuel your inner DIYer:
Unlimited Design Options
Stepping stone designs are only limited to your creativity and budget. The idea is simple – to build a formal or informal pathway of stones that blends with your garden’s landscape and gives it the desired appearance. Moreover, you can combine stones of different shapes and sizes to create a unique visual interest and texture.
Durability
Stepping stones are literally made of stones (or concrete), so they’re naturally tough and durable. Unlike other décor elements, they’re not prone to damage by extreme weather or foot traffic. Concrete is inherently water-resistant, so you don’t have to worry about moisture building and slipping.
Little or No Maintenance
Due to their durability and longevity, garden stepping stones are incredibly low maintenance, and they rarely require any upkeep. To clean them, all you need is a long garden hose and water to remove the debris. Concrete doesn’t absorb stains, so you don’t need to waste time scrubbing them with a detergent.
Cost-Effective
Installing DIY garden stones is incredibly cost-effective compared to other home improvement projects. To save time, you can opt for quick drying concrete and readily-available stepping stone molds on Amazon. This ensures that you not only get more value for your money but also save a significant amount of time compared to more laborious projects.
How to Make a Personalized Stepping Stone for Your Garden
Taking on a DIY stepping stone project can be incredibly simple and typically requires the four essential steps below:
- Acquiring concrete in the form of concrete mix or powder to form the base of your stone.
- Making/buying a mold to give your stepping stone the desired shape.
- Decorating the garden stepping stone with different materials or patterns while the mix is wet.
- Positioning and lining up the stones in your garden once they’re dry.
Now that you have an idea of how to make garden stones, let’s dive into the full requirements and steps to complete this DIY project:
Tools/Equipment
- Mold(s)
- Shovel
- Protective equipment (rubber gloves, face mask, safety goggles, etc.)
- Shovel
- Screed or 2×4 short
- Tub, bucket, or wheelbarrow
- Rubber mullet
- Paint mixer (optional)
- Newspaper and drop cloth
Materials
- Water
- Pre-mixed quick-setting concrete or stepping stone concrete
- Non-stick spray or Vaseline (petroleum jelly)
- Embellishments (tile, concrete paint, glass, sparkles, handprints, and even cookie cutters, etc.)
Steps
Prepare the Mold
The first step is to grease the inside of your mold with cooking spray, oil, or petroleum jelly. This will make the garden stones easier to remove once they’re dry. Once the mold(s) are set, place them aside and get ready to prepare the concrete mix.
Mix the Stepping Stone Concrete
Next, pour some of the concrete into a bucket, wheelbarrow, or tube along with water as per the package instructions. Make sure you add little water at a time to ensure you don’t make the mixture too runny. What you’re looking for is a mix that’s neither pasty nor soupy. You can test the consistency using your shovel like a knife to cut a thin channel through the surface. If it’s too wet, the channel will fill with water, which means it requires more concrete. Similarly, if the channel walls are too crumbly, you need to add more water and smoothen it.
Add the Concrete Mixture to Your Mold
Once your concrete mixture is ready, gently pour it into the molds and tamp to remove any air bubbles. You can screed the excess concrete off the top using a screed or something similar. Carefully set the molds aside and wait for them to partially dry.
Decorate Your Stepping Stones
Once the molds are partially dry, you can add your desired embellishments to the top of the concrete. You don’t have to necessarily add marble or tiles to them. You can make do with handprints, footprints, and other creative impressions made using other objects, such as Legos, shells, leaves, and toy animals, etc.
Let the Concrete Cure and Dry
Once you’re done with the decorations, the next step is to simply let the stepping stones cure and dry in the sun. After this period, gently flip the molds upside down and tap around them using a rubber mallet. If your greasing solution worked, the mold should come off easily.
Lay the Stepping Stones
Now that your DIY garden stepping stones are ready, the last step is to lay and position them in your garden. To do this, you simply have to sink them into the soil or mulch and make the necessary adjustments to hold them in place.
Conclusion
And there you have it – how to make garden stepping stones in six easy steps. With this information, you’re just a fun weekend away customizing your garden with personalized stepping stones. So, what are you waiting for? Head to the local store or order your favorite molds and stepping stone concrete mix to get started with this incredibly cost-effective, creative, and fulfilling DIY home improvement project.
