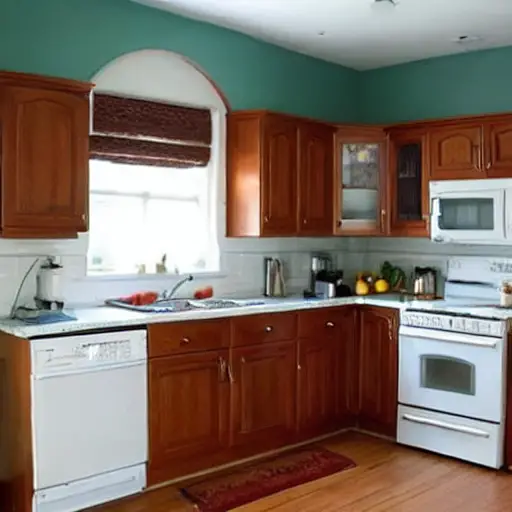
Paint Your Cabinets

Choose the Right Paint
Choosing the right paint can make a huge difference in your kitchen’s overall look and feel. Opt for a high-quality paint that is durable and easy to clean. Consider using a semi-gloss or satin finish, as they are both great options for kitchens. These finishes are resistant to moisture and grease, making them perfect for high-traffic areas like the kitchen. When it comes to color, choose a shade that complements your cabinets, countertops, and backsplash. Neutral colors like white, beige, and gray are always safe, but don’t be afraid to add a pop of color with a bold accent wall or colorful accessories. With the right paint, you can transform your kitchen into a stylish and inviting space without breaking the bank.
Remove Cabinet Doors and Hardware
Removing cabinet doors and hardware is a simple and cost-effective way to give your kitchen a fresh look. Not only does it open up your space and make it feel larger, but it also allows you to showcase your favorite dishes and kitchenware. You can leave some cabinets open for display purposes, and others closed for storage. Additionally, removing hardware such as knobs and handles allows you to update them with more modern or unique options. This DIY project can be completed in just a few hours and will instantly transform the look and feel of your kitchen.
Clean and Sand the Cabinets
Before you start painting or staining your kitchen cabinets, it’s important to clean and sand them thoroughly. This will ensure the new finish adheres properly and looks smooth and even. Begin by removing all the cabinet doors and hardware, then clean them with a degreaser to remove any built-up grime or grease. Once they’re dry, use fine-grit sandpaper to sand the surfaces lightly, making sure to remove any rough spots or bumps. Don’t forget to sand the edges and corners as well. After sanding, wipe the cabinets down with a damp cloth to remove any dust or debris before moving on to the next step.
Prime and Paint the Cabinets
Prime and Paint the Cabinets: One of the most cost-effective ways to give your kitchen a fresh new look is by painting your cabinets. Start by removing all cabinet doors and hardware, then clean and sand the surfaces to ensure a smooth finish. Apply a coat of primer to help the paint adhere better and prevent any stains or discoloration from showing through. Once the primer is dry, apply a couple of coats of paint in your desired color. You can also add some personality to your cabinets by using stencils or adding a pop of color to the inside of the cabinets. This simple DIY project can completely transform the look of your kitchen without breaking the bank.
Reattach Doors and Hardware
One of the easiest and most cost-effective ways to give your kitchen a facelift is by reattaching doors and hardware. Over time, cabinet doors and drawers can become loose or misaligned, making your kitchen look shabby and outdated. By simply tightening screws and adjusting hinges, you can instantly improve the look and functionality of your cabinets. Replacing old or worn-out hardware with new knobs and pulls can give your cabinets a fresh, modern look without breaking the bank. With just a few simple tools and some elbow grease, you can transform your kitchen in no time.
Update Your Backsplash

Choose a New Backsplash Material
Choosing a new backsplash material can completely transform the look of your kitchen without breaking the bank. Consider using peel-and-stick tiles, which are easy to install and come in a variety of colors and patterns. Another budget-friendly option is to paint your existing backsplash with a high-quality paint designed for kitchens and bathrooms. If you want a more unique look, use reclaimed wood or a collection of vintage plates as your backsplash. Whatever material you choose, make sure it complements your kitchen’s overall style and color scheme.
Remove the Old Backsplash
Removing the old backsplash is a great way to give your kitchen a fresh look without spending much money. You can do this yourself with a few simple tools and elbow grease. Start by turning off the power to any electrical outlets or switches in the area. Then, use a utility knife to score the grout around the tiles. Next, use a chisel and hammer to remove the tiles carefully. Be sure to wear gloves and eye protection to avoid injury. Once the tiles are removed, use a scraper to remove any remaining adhesive or grout. Finally, clean the area thoroughly with a damp cloth and allow it to dry completely before installing a new backsplash.
Prepare the Wall
Before starting any kitchen renovation project, it is crucial to prepare the walls properly. This step will ensure the new paint or wallpaper adheres well and looks flawless. Removing any old wallpaper or loose paint using a scraper or sandpaper. Next, fill any holes or cracks with spackle and sand them down until smooth. If the walls are greasy or dirty, wash them with warm soapy water and let them dry completely. Finally, apply a coat of primer to the walls to create a smooth and even surface for the new paint or wallpaper to adhere to. Taking the time to prepare the walls will make a significant difference in the final outcome of your DIY kitchen renovation project.
Install the New Backsplash
Installing a new backsplash is a great way to give your kitchen a fresh and updated look. Many affordable options are available, such as peel-and-stick tiles or painted plywood. You can also use recycled materials like old wine corks or salvaged wood to create a unique, eco-friendly backsplash. Whatever material you choose, measure carefully and use a level to ensure a professional-looking installation. With a little effort, you can transform your kitchen into a stylish and functional space without breaking the bank.
Seal the Edges
Seal the Edges: One of the most important steps in any kitchen renovation is ensuring that all edges are properly sealed. This includes the edges of countertops, backsplashes, and cabinets. Not only does sealing prevent water damage and mold growth, but it also gives your kitchen a polished and professional look. Many affordable sealant options are available at your local hardware store, and applying them is a simple DIY task. Just follow the manufacturer’s instructions carefully and allow ample drying time before using your kitchen again.
Replace Your Countertops

Choose a Budget-Friendly Material
Choosing the right materials can make all the difference when it comes to renovating your kitchen on a budget. One of the best ways to save money is to opt for budget-friendly materials that still look great. For example, laminate countertops can mimic the look of more expensive materials like granite or marble, but at a fraction of the cost. Similarly, vinyl or laminate flooring can be a cost-effective alternative to hardwood or tile. Choosing materials that fit your budget allows you to achieve a stylish and functional kitchen without breaking the bank.
Measure Your Countertops
Before starting any kitchen renovation project, measuring your countertops accurately is important. This will help you determine the needed materials and ensure that everything fits properly. To measure your countertops, start by measuring the length and width of each section. Be sure to measure from the back wall to the edge of the countertop and add a few inches for overhang. If you have an L-shaped or U-shaped countertop, measure each section separately and add the measurements. Once you have your measurements, you can start shopping for materials and planning your renovation.
Remove the Old Countertops
Removing old countertops is a great way to give your kitchen a fresh new look without spending a lot of money. You can do this yourself with simple tools, such as a pry bar, screwdriver, and utility knife. Start by turning off the water supply to your sink and disconnecting any plumbing or electrical connections. Then, use the pry bar to loosen the old countertop from the cabinets and remove any screws or nails holding it in place. Once the old countertop is removed, you can install a new one or refinish it to give it a new look. This is a great DIY project that can be completed in a weekend and will make a big difference in the overall appearance of your kitchen.
Install the New Countertops
Installing new countertops can give your kitchen a fresh and updated look. However, it can also be a costly renovation. Consider using alternative materials such as laminate or butcher block to save money. These materials are less expensive than granite or quartz but still offer durability and style. Another way to save money is to install the countertops yourself. Many home improvement stores offer DIY countertop kits with everything you need to install the countertops yourself. With some patience and basic tools, you can have a brand-new countertop in no time.
Seal the Edges
Seal the Edges: One of the most important steps in any kitchen renovation is ensuring that all edges and seams are properly sealed. This not only helps to prevent water damage and mold growth, but it also gives your kitchen a more polished and professional look. Various sealants are available on the market, including silicone, caulk, and grout. Be sure to choose a product that is specifically designed for use in kitchens, and that matches the color of your countertops and backsplash. Applying sealant can be messy, so have plenty of rags and a steady hand. With a little patience and attention to detail, you can easily seal the edges of your kitchen and give it a fresh new look.
Add a Fresh Coat of Paint

Choose the Right Paint
Choosing the right paint can make a huge difference in your kitchen’s overall look and feel. Opt for high-quality paint that is durable and easy to clean, especially in high-traffic areas like the kitchen. Neutral colors like white, beige, and gray are popular for kitchen walls, creating a clean and timeless look. However, don’t be afraid to add a pop of color with a bold accent wall or colorful cabinets. Just make sure the color complements the rest of your kitchen decor. Don’t forget to prime your walls before painting to ensure a smooth and even finish.
Prepare the Walls
Preparing the walls is an essential step in any kitchen renovation project. Start by removing any old wallpaper or peeling paint. If the walls are in good condition, you can clean them with warm water and mild soap. For walls with cracks or holes, use spackle to fill them in and smooth them once dry. It’s also a good idea to prime the walls before painting to ensure the paint adheres properly and lasts longer. Don’t forget to protect your floors and countertops with drop cloths or plastic sheeting while you work. With a little elbow grease and attention to detail, your kitchen walls will be ready for a fresh coat of paint or new backsplash in no time.
Paint the Walls
Painting the walls is one of the easiest and most cost-effective ways to give your kitchen a fresh look. You can choose a bold color to make a statement or a neutral shade to create a calming atmosphere. Before you start painting, clean the walls thoroughly and patch any holes or cracks. Use painter’s tape to protect areas you don’t want to paint, such as trim and cabinets. You can also consider adding a fun accent wall or using stencils to create a unique pattern. With a little bit of time and effort, painting your kitchen walls can make a big difference in your space’s overall look and feel.
Touch Up and Finish
Touch-Up and Finish: Once you’ve completed the major renovations, it’s time to focus on the finishing touches. One easy way to give your kitchen a fresh look is to touch up any scuffs or scratches on your cabinets and walls. You can do this by using a paint touch-up kit or a marker that matches the color of your cabinets or walls. Additionally, consider updating your cabinet hardware with new knobs or handles. This simple change can greatly impact the overall look of your kitchen. Finally, add decorative elements such as a new backsplash or window treatments to tie everything together. These small changes can make a big difference in your kitchen’s overall look and feel without breaking the bank.
Upgrade Your Lighting

Choose New Light Fixtures
Choosing new light fixtures is a great way to give your kitchen a fresh look without breaking the bank. Consider swapping out outdated or mismatched fixtures for modern, energy-efficient options. Pendant lights over the kitchen island or sink can add a stylish touch, while under-cabinet lighting provides ambiance and functionality. Don’t forget also to consider the color temperature of your bulbs, as warm or cool lighting can drastically change the mood of your space. With a little research and some DIY installation, new light fixtures can transform your kitchen into a bright and inviting space.
Remove Old Light Fixtures
Removing old light fixtures is a simple and cost-effective way to update the look of your kitchen. You can replace outdated fixtures with modern ones that match your kitchen’s style and decor. Before removing the old fixtures, turn off the power supply to avoid any electrical hazards. Once the power is off, replace the old fixtures with new ones. You can also consider installing under-cabinet lighting to brighten up your kitchen and create a cozy ambiance. With a little effort and creativity, you can transform your kitchen into a stylish and functional space without breaking the bank.
Install New Light Fixtures
Installing new light fixtures is a great way to give your kitchen a fresh look without spending much money. You can choose from various styles, including pendant lights, chandeliers, and track lighting. Installing dimmer switches can also add a touch of ambiance to your kitchen. If you’re not comfortable with electrical work, consider hiring a professional to help with the installation. With the right lighting, you can create a warm and inviting atmosphere in your kitchen, making it a pleasure to cook and entertain in.
Add Under-Cabinet Lighting
Adding under-cabinet lighting is an easy and affordable way to give your kitchen a modern and stylish look. Not only does it enhance the ambiance of the room, but it also provides functional lighting for cooking and food preparation. There are many options for under-cabinet lighting, including LED strips, puck lights, and tape lights. LED strips are the most popular choice as they are energy-efficient and provide bright, even lighting. Installation is simple and can be done with adhesive strips or screws. Under-cabinet lighting lets you transform your kitchen into a bright and inviting space without breaking the bank.
Now that you have some great DIY kitchen renovation ideas, it’s time to get started! Remember to plan out your project carefully, set a budget, and gather all the necessary tools and materials before you begin. And if you need some more inspiration or guidance, be sure to check out DIY Gazette. This website is a great resource for DIY enthusiasts, offering a wide range of tutorials, tips, and tricks for all kinds of home improvement projects.
