Introduction
Benefits of raised garden beds
Several benefits of raised garden beds make them a popular choice for gardening enthusiasts. Firstly, they provide better drainage and aeration for plants, which can lead to healthier growth and higher yields. Secondly, raised garden beds can be easier to maintain and weed, as they are elevated off the ground and can be designed to fit the gardener’s needs. Additionally, raised garden beds can be a great solution for those with limited space or poor soil quality, as they allow for more control over the growing environment. Finally, raised garden beds can be a beautiful addition to any outdoor space, adding a touch of charm and character to your garden.
Materials needed
You will need a few essential materials to build a raised garden bed. First, you will need lumber to construct the frame of the bed. Cedar or redwood are popular choices for their durability and resistance to rot. You will also need screws or nails to secure the lumber together. Next, you will need soil to fill the bed. It’s important to choose high-quality soil that is rich in nutrients and drains well. Lastly, consider adding a weed barrier to prevent unwanted growth in your garden bed. With these materials, you’ll be well on your way to building a beautiful and productive raised garden bed.
Step 1: Choose a location
Consider sunlight and drainage
When choosing a location for your raised garden bed, it’s important to consider the amount of sunlight and drainage in the area. Most vegetables and herbs require at least six hours of direct sunlight daily, so choose a spot with plenty of sunlight. Additionally, ensure the area has good drainage to prevent water from pooling and causing root rot. If your chosen location has poor drainage, consider adding a layer of gravel or sand at the bottom of the bed to improve drainage. By considering these factors, you can ensure that your raised garden bed will provide the optimal growing conditions for your plants.
Accessibility
Accessibility is an important consideration when building a raised garden bed. The height of the bed should be such that it is easy to reach and tend to the plants without straining your back or arms. A height of 2-3 feet is ideal for most gardeners. Additionally, leaving enough space between the beds is important for easy movement and access to all sides of the bed. This will make it easier to plant, weed, and harvest your crops. If you plan on using a wheelchair or have limited mobility, consider building a wider bed with a lower height to allow for easy access.
Step 2: Gather materials
Wood or other materials for the frame
Wood is a popular option When choosing the material for your raised garden bed frame. Cedar and redwood are great choices as they naturally resist rot and insects. However, they can be more expensive than other types of wood. Pressure-treated lumber is another option but it contains chemicals that may leach into the soil over time. If you want to avoid wood, you can use other materials such as bricks, concrete blocks, or recycled plastic lumber. Just make sure the material you choose is sturdy enough to hold the weight of the soil and plants.
Soil and compost
Soil and compost are essential components of a successful raised garden bed. When choosing soil, look for a high-quality mix rich in organic matter and nutrients. Avoid using soil from your yard, as it may contain weed seeds or pests. Compost is also important for providing plant nutrients and improving soil structure. You can purchase compost or make your own by composting kitchen scraps and yard waste. Aim to have a mix of 50% soil and 50% compost in your raised garden bed for optimal plant growth.
Tools needed
You will need a few essential tools to build a raised garden bed. Firstly, a shovel or spade will be necessary to dig out the area where you plan to place the bed. A level will also come in handy to ensure that the bed is even and stable. A saw or a pair of pruning shears will be needed to cut the wood or other materials used to construct the bed. A drill and screws will be necessary to secure the pieces of wood together. Finally, a wheelbarrow will be useful for transporting soil and other materials to the garden bed site. With these tools, you’ll be well-equipped to build your own raised garden bed.
Step 3: Build the frame
Cut the wood to size
Once you have measured and marked the wood, it’s time to cut it to size. Use a saw to cut the boards according to your measurements. Wear protective gear such as gloves and safety glasses while cutting the wood. If you don’t have a saw, you can ask a hardware store to cut the wood. Once you have all the pieces cut, double-check the measurements to ensure they are all the correct size.
Assemble the frame
Once you have all the necessary materials, it’s time to assemble the frame of your raised garden bed. Start by laying out the four corner posts in a square or rectangular shape, depending on the size of your bed. Use a level to ensure that the posts are all the same height. Then, attach the side boards to the corner posts using screws or nails. Make sure to pre-drill holes to prevent the wood from splitting. Once all the sides are attached, double-check that the frame is level and square. Finally, add any additional support beams or braces as needed to ensure the frame is sturdy and secure.
Add corner braces
After the raised garden bed frame is assembled, it’s important to add corner braces to ensure stability and prevent the bed from shifting or warping over time. To do this, attach a metal L-bracket to each corner of the frame using screws. Ensure the bracket is flush with the top of the frame and securely fastened. This will provide additional support and keep the bed in place, even when filled with soil and plants.
Step 4: Add soil and compost
Fill the frame with soil and compost
Once the frame is in place, it’s time to fill it with soil and compost. Start by adding a layer of cardboard or newspaper to the bottom of the bed. This will help to suppress any weeds that may try to grow up through the soil. Next, add a layer of compost, followed by a layer of topsoil. Repeat this process until the bed is filled to the desired height. Be sure to water the soil thoroughly after each layer to help settle it in place. Once the bed is filled, it’s ready for planting!
Mix thoroughly
After you have added all the necessary components to your raised garden bed, it’s time to mix them thoroughly. Use a garden fork or a shovel to turn the soil and mix in the compost, peat moss, and other amendments. Make sure to break up any clumps and distribute the materials evenly throughout the bed. This will ensure that your plants have access to all the nutrients they need to grow healthy and strong. Once you have mixed everything thoroughly, water the bed well to help settle the soil and prepare it for planting.
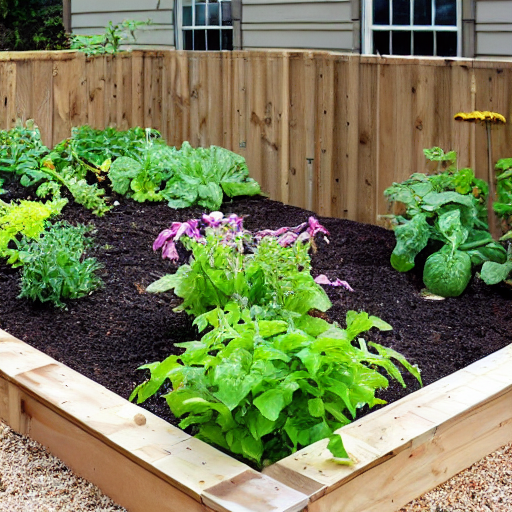
Step 5: Plant your garden
Choose plants that thrive in raised beds
When choosing plants for your raised garden bed, it’s important to consider their growing habits and preferences. Some plants, such as tomatoes, peppers, and eggplants, thrive in raised beds’ warm, well-draining soil. Others, like root vegetables and herbs, appreciate the loose, fertile soil that can be easily amended in a raised bed. Additionally, you may want to consider planting companion plants that can help deter pests or improve soil health, such as marigolds or legumes. Ultimately, the key is to choose plants that will thrive in the specific conditions of your raised bed, and to plan your garden accordingly.
Arrange plants according to their needs
Once your raised garden bed is built, arranging your plants according to their needs is important. This means considering factors such as sunlight, water, and soil requirements. For example, plants that require full sun should be placed in areas that receive at least six hours of direct sunlight per day. Similarly, plants that require moist soil should be placed in well– drained areas that retain moisture. By arranging your plants according to their needs, you can ensure that they thrive and produce a bountiful harvest.
Conclusion
Enjoy the benefits of your raised garden bed
Once your raised garden bed is complete, you can start enjoying its many benefits. Raised garden beds provide better drainage, making your plants less likely to become waterlogged and develop root rot. They also allow you to control the soil quality, which is particularly important if your yard has poor soil. Additionally, raised garden beds make it easier to tend to your plants, as you don’t have to bend down as far to weed or harvest. Finally, raised garden beds can add aesthetic value to your yard, as they can be designed to complement your home’s architecture or landscaping. So sit back, relax, and enjoy your labor’s fruits (and vegetables)!
Maintenance tips
Maintenance Tips:
Once you have built your raised garden bed, it is important to maintain it properly to ensure healthy plant growth. Regular watering is essential, especially during hot and dry weather. You can also add a layer of mulch to help retain moisture in the soil. Weeding is another important task to keep your garden bed free from unwanted plants that can compete with your crops for nutrients. Additionally, you should regularly check for pests and diseases and take appropriate measures to prevent or treat them. Finally, it is a good idea to periodically add compost or other organic matter to the soil to replenish nutrients and improve soil structure. By following these maintenance tips, you can enjoy a thriving and productive raised garden bed.
Next Steps: Now that you have all the materials and tools to build your raised garden bed, it’s time to start! Follow the steps outlined in this article and you’ll have a beautiful and functional garden bed in no time. If you’re looking for more DIY projects and inspiration, be sure to check out DIY Gazette. With a wide range of articles and tutorials, you’re sure to find something that sparks your creativity. Happy gardening!
