Introduction
Why refurbish old furniture?
Refurbishing old furniture is not only a cost-effective way to update your home decor, but it also helps to reduce waste and promote sustainability. You can create unique and personalized furniture that reflects your style and personality by giving new life to old pieces. Refurbishing old furniture can also be a fun and rewarding DIY project that allows you to learn new skills and techniques. Whether you’re looking to save money, reduce your environmental impact, or enjoy the process of transforming old furniture into something new, refurbishing old furniture is a great option to consider.
Benefits of refurbishing old furniture
Refurbishing old furniture has numerous benefits. Firstly, it is an eco-friendly way of decorating your home. Refurbishing old furniture prevents it from ending up in a landfill and reduces the demand for new furniture. Secondly, it is a cost-effective way of decorating your home. Instead of buying new furniture, you can give a new life to your old furniture by refurbishing it. Thirdly, it is a great way to add a personal touch to your home decor. Refurbishing old furniture allows you to customize it according to your taste and style. Lastly, it is a fun and rewarding DIY project that can give you a sense of accomplishment and satisfaction.
Things to consider before refurbishing old furniture
Before diving into the process of refurbishing old furniture, there are a few things to consider. Firstly, it’s important to assess the condition of the piece and determine if it’s worth the time and effort to refurbish it. If the furniture is structurally unsound or has extensive damage, it may not be worth the investment. Additionally, it’s important to consider the cost of materials and tools needed for the project. Refurbishing furniture can be expensive, so it’s important to budget accordingly. Finally, it’s important to have realistic expectations for the final outcome. Refurbishing old furniture can be rewarding, but it’s important to remember that the finished product may not look brand new. With these considerations in mind, you can make an informed decision about whether or not to refurbish your old furniture.
Step 1: Assess the furniture
Inspect the furniture
Inspecting the furniture is the first step in refurbishing old furniture. Before starting any work, you must examine the piece carefully to determine its condition. Look for any cracks, chips, or scratches on the surface. Check the joints and corners to see if they are loose or wobbly. If the furniture has drawers, make sure they slide in and out smoothly. Also, check for any signs of woodworm or other pests. Once you have identified any issues, you can plan your refurbishment accordingly.
Determine the type of wood
Before you start refurbishing old furniture, it’s important to determine the type of wood you’re working with. This will help you choose the right products and techniques to ensure the best results. One way to identify the type of wood is to look for any markings or labels on the furniture itself. If there are no markings, you can use a wood identification guide or consult with a professional. Knowing the type of wood will also help you determine the level of sanding and preparation needed before applying any stains or finishes. So take the time to properly identify the wood before starting your refurbishing project.
Check for damages
Before starting refurbishing, it’s important to thoroughly check the furniture for any damages. Look for cracks, chips, scratches, or any other signs of wear and tear. If there are any loose or broken parts, fix them before proceeding. This will ensure that the furniture is sturdy and safe to use. Additionally, identifying damages early on will help you determine the extent of the refurbishing needed and what materials and tools you’ll need to complete the project.
Decide on the refurbishing method
Once you have assessed the condition of your furniture, it’s time to decide on the refurbishing method. There are several options available, including painting, staining, reupholstering, and refinishing. Painting is a great option if you want to completely change the look of your furniture, while staining is ideal for bringing out the natural beauty of wood. Reupholstering is perfect for giving your furniture a fresh new look, and refinishing can restore your piece’s original shine and luster. Consider the type of furniture you have and your personal style when deciding on the best refurbishing method for your project.
Step 2: Prepare the furniture
Clean the furniture
Before starting the refurbishing process, it is essential to clean the furniture thoroughly. This step is crucial as it removes any dirt, grime, or grease that may have accumulated over time. Begin by wiping the furniture with a dry cloth to remove any loose dust or debris. Next, gently scrub the surface with a mild soap solution and a soft-bristled brush. Be sure to avoid using harsh chemicals or abrasive materials that can damage the furniture’s finish. Once you have cleaned the furniture, allow it to dry completely before moving on to the next step. A clean surface will ensure that the new finish adheres properly and looks its best.
Remove old paint or finish
Removing old paint or finish is an essential step in refurbishing old furniture. The first thing you need to do is determine the finish type or paint on the furniture. If it’s a painted surface, you can use a paint stripper to remove the old paint. However, if it’s a varnish or lacquer finish, you’ll need to use a solvent-based stripper. Once you’ve applied the stripper, let it sit for the recommended time, and then use a scraper to remove the old finish. Be sure to wear gloves and work in a well-ventilated area. After removing the old finish, sand the surface to smooth out any rough spots and prepare it for the new finish.
Sand the furniture
Sand the furniture:
Once you have removed all the old paint or varnish from the furniture, the next step is to sand it. Sanding helps smooth out rough patches and prepares the surface for painting or staining. Start by using a coarse-grit sandpaper to remove any remaining paint or varnish. Then, switch to a finer-grit sandpaper to smooth out the surface. Be sure to sand in the direction of the grain to avoid damaging the wood. Once you have finished sanding, wipe down the furniture with a damp cloth to remove any dust or debris. Your furniture is now ready for the next step in the refurbishing process.
Fill in gaps or cracks
After sanding down the furniture, it’s common to find gaps or cracks in the wood. These can be unsightly and also weaken the structure of the piece. To fill in these gaps or cracks, you’ll need wood filler. Choose a filler that matches the color of the wood as closely as possible. Apply the filler to the gap or crack with a putty knife, pressing it in firmly. Smooth out the surface of the filler with the putty knife or a sanding block. Allow the filler to dry completely before sanding it down to a smooth finish. Once the filler is sanded down, you can paint or stain the furniture.
Step 3: Refurbish the furniture
Apply primer
Once you have sanded down your furniture and cleaned it thoroughly, it’s time to apply primer. Primer is essential for ensuring that the paint adheres properly to the surface of your furniture. It also helps to cover up any stains or imperfections that may be present. When choosing a primer, make sure to select one that is suitable for the type of paint you plan to use. Apply the primer evenly, using a brush or roller, and make sure to cover all surfaces thoroughly. Allow the primer to dry completely before moving on to the next step. This may take several hours, so be patient and resist the urge to rush the process. Once the primer is dry, your furniture will be ready for the next stage of the refurbishing process.
Paint or stain the furniture
Once you have sanded and cleaned the furniture, it’s time to decide whether you want to paint or stain it. Painting is a great option if you want to completely change the look of the piece or if it has many imperfections you want to cover up. Staining, on the other hand, is a good choice if you want to enhance the natural beauty of the wood grain. Before you start painting or staining, make sure to choose the right type of paint or stain for your furniture and follow the manufacturer’s instructions carefully. It’s also important to work in a well-ventilated area and use protective gear such as gloves and a mask. Once you’re done, let the paint or stain dry completely before moving on to the next step.
Apply a protective finish
Once you have completed all the necessary repairs and refinishing, applying a protective finish to your refurbished furniture is important. This will help to protect the surface from scratches, spills, and other types of damage. Many types of protective finishes are available, including wax, varnish, and polyurethane. Each type of finish has its own unique properties and benefits, so it’s important to choose the one that best suits your needs. Before applying the finish, ensure the surface is clean and free of dust or debris. Apply the finish in thin, even coats, using a brush or a cloth. Allow each coat to dry completely before applying the next one. Once you have applied the final coat, allow the finish to dry completely before using the furniture.
Reassemble the furniture
Once you have completed all the necessary repairs and refinishing, it’s time to reassemble the furniture. Begin by laying out all the pieces in the order they will be assembled. Make sure you have all the necessary hardware and tools on hand. Follow the manufacturer’s instructions or use your own knowledge to put the furniture back together. Be careful not to overtighten screws or bolts, as this can cause damage to the wood or other materials. Once the furniture is fully assembled, give it a final inspection to ensure everything is secure and in place. Congratulations, you have successfully refurbished your old furniture!
Step 4: Final touches
Replace hardware
Replacing hardware is an important step in refurbishing old furniture. Over time, hardware can become worn, damaged, or outdated, detracting from the piece’s overall appearance. When replacing hardware, it’s important to choose pieces that are the right size and style for the furniture. This can involve measuring the existing hardware and selecting new pieces that match the size and shape. It’s also important to consider the style of the furniture and choose hardware that complements it. For example, ornate hardware may be appropriate for antique furniture, while sleek, modern hardware may be better suited for contemporary pieces. With the right hardware, old furniture can be transformed into a beautiful, functional piece that adds character and style to any room.
Add decorative elements
Once you have completed the refurbishing process, it’s time to add some decorative elements to your furniture piece. This step is where you can get creative and add your personal touch to the furniture. You can choose to add a coat of paint or stain to give it a new look. You can also add decorative knobs or handles to the drawers or doors. Another option is to add stencils or decals to the surface of the furniture to create a unique design. Whatever you choose, make sure it complements the style and color of the furniture and enhances its overall appearance. Adding decorative elements is the final touch that will make your refurbished furniture piece stand out and look brand new.
Clean and polish the furniture
Once you have removed any dirt and grime from the furniture, it’s time to polish it well. This will not only make it look shiny and new but also help protect the wood from future damage. There are a variety of different polishes you can use, including wax, oil, and varnish. Be sure to choose a product that is appropriate for the type of wood you are working with. Apply the polish in a thin, even layer, using a soft cloth or brush. Allow it to dry completely before buffing it with a clean cloth. Repeat this process as necessary until you achieve the desired level of shine.
Conclusion
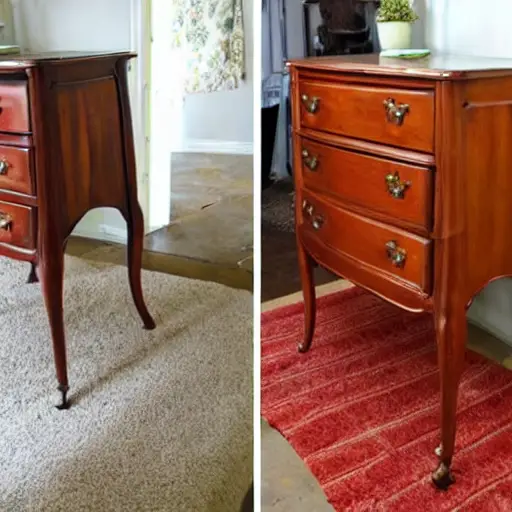
Enjoy your refurbished furniture
After putting in all the hard work to refurbish your old furniture, it’s time to sit back and enjoy the fruits of your labor. Take a moment to appreciate the transformation that has taken place and the new life that you have breathed into your furniture. Whether it’s a new coat of paint, a fresh set of cushions, or a complete overhaul, your refurbished furniture is now a unique piece that reflects your personal style and creativity. So, go ahead and show it off to your friends and family, and enjoy the satisfaction of knowing that you have given new life to something that was once forgotten.
Tips for maintaining refurbished furniture
Once you have successfully refurbished your old furniture, it is important to maintain it properly to ensure its longevity. Here are a few tips to help you maintain your refurbished furniture: Firstly, avoid placing your furniture in direct sunlight or near a heat source as this can cause the wood to dry out and crack. Secondly, use coasters or placemats to protect the surface of your furniture from scratches and stains. Thirdly, dust your furniture regularly with a soft cloth or a feather duster to prevent the buildup of dirt and grime. Lastly, avoid using harsh chemicals or abrasive cleaners as they can damage the finish of your furniture. By following these simple tips, you can keep your refurbished furniture looking beautiful for years to come.
Benefits of refurbishing old furniture
Refurbishing old furniture has numerous benefits. Firstly, it is an eco-friendly option as it reduces waste and prevents furniture from ending up in landfills. Secondly, it is a cost-effective way to update your home decor as buying new furniture can be expensive. Refurbishing old furniture allows you to give it a new lease of life and create a unique piece that reflects your personal style. Additionally, it can be a fun and rewarding DIY project that allows you to learn new skills and unleash your creativity. Finally, refurbishing old furniture can also add value to your home as it can increase the appeal of your space and make it more attractive to potential buyers.
Now that you have successfully refurbished your old furniture, it’s time to show it off! Whether you plan on using it in your own home or selling it for a profit, it’s important to care for your newly restored piece properly. Regular cleaning and maintenance will help keep it looking great for years to come. For more DIY tips and inspiration, be sure to check out our other articles on DIY Gazette. Happy refurbishing!
