There are plenty of DIY handbag ideas to make and sell. It is about one of the most profitable DIY crafts to sell. No one can deny the fact that girls love to buy bags. What would life be like without handbags?
It is about an easy craft to sell, and ladies will love them.
There are plenty of different ideas and shapes. However, the best is to try and stay in the fashion trends.
Bag or a Purse from an old book
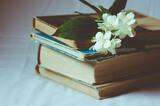
You shouldn’t be allowed to destroy books for making bags. Let’s just say that you can use only the spoiled books where you spilled a cup of coffee on the pages. It is about a unique DIY handbag idea that you will sell out directly.
How to make it?
- Find a hardbound book with an appealing cover.
- Take your book apart. Use a knife and cut out all the pages of the book. You need only the cover.
- Cut a fabric the same size as the book cover, fold the edges in 1/2 inch, and iron.
- If you want a bag and not a clutch, it is the time for the handles. There are plenty of shops which sell bag handles. Search it online and make a purchase. When you are ready, use some of your fabric to create straps for attaching your handles to the inside of the book.
- Glue the fabric straps to the book. You can try E6000 glue; it is the mother of the craft glue. At this stage, you need to be prepared for the smell; you can’t avoid it!
- Set that aside to let it dry.
- Get out a relatively large piece of paper.
- Measure each side of the book’s width and draw a line on the exact length about 75 degrees spine’s mark. (It controls how wide your purse will open).
- Do the same as the above length size.
And continues
- Cut two pieces of fabric for lining your purse.
- Take a piece of the fabric. Put the right sides of the fabric watching each other, sew the edges of the triangles to the edges of the square.
- Repeat with the second piece of fabric
- Put the right side inside the left side of the piece, and sew around the top edge. Remember to leave a big enough hole for your hand.
- Turn the whole thing inside out.
- Spread glue on the inside of the book and carefully attach the fabric.
Be patient, and your bag/purse will be shortly ready. If you find it plain, you can always decorate your book’s cover with multiple patterns and colors. The decision is yours.
In the video below, you will find all the information for creating a bookish craft handbag.
Book handbags are an excellent choice for people who love the vintage look. However, with suitable shapes and patterns, you can transform it into something modern and stylish.
DIY envelope clutch

Create an everyday or formal envelope clutch that is just right for your essential stuff. Customize your clutch with a flower or geometrical pattern or any shape that you want. You can even transform your envelope clutch into a suitable night-out bag. There are no limitations.
You don’t need much fabric to create an envelope clutch. With this sewing project, you can make handmade holiday gifts, inexpensive birthday presents, or even a new income source.
With few sewing skills, you can easily create an envelope clutch in one hour, with no effort.
Sew your own DIY craft envelope clutch by following 7 simple steps.
- Layer the exterior fabric rectangle and line it with right sides together.
- Fold Corners at one short end until they meet in the middle. Press them with an iron.
- Cut to Create Shape. Unfold the corners and cut through all layers on the pressed lines to make the envelope shape.
- Stitch and Turn. Sew around and leave only 4 inches for opening along. Remember to keep your raw edges even as it will make your effort easier. Use a pencil eraser to push the corner points out.
- Stitch Bottom Edge. Make sure that the right side of the needle reaches the off the edge of the fabric. You’ll be stitching through 3 layers now.
- Form Envelope. Fold the bottom edge up and pin each side edge straight. Backstitching at the beginning and ending of each sewing, zigzag-stitch each 7-inch turned-up edge.
- Add you closure.
What is better than creating your own elegant envelope clutch?
Simple tote bags
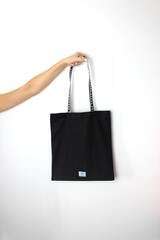
Sewing your own bags seems magnificent. Learning how to create a simple tote bag can be proven quite profitable. Even kids can make their own tote bags.
What you’ll need:
Equipment / Tools
- Sewing machine
- cutter
- Ruler
- Pins
- Scissors
- Pencil
Materials
- Wool blend felt
- Decoration stuff, like bottoms.
- Thread
Don’t feel overwhelmed by the materials; the instructions are simple!
- Cut the felts. You will need three pieces of felts. One big enough for the whole bag and the other two for the handles. Adjust the size to your needs
- Sew your desired decorations on your felt. You may want to add some flowers or different patterns and shapes. Stich some buttons on your felt or any fun design.
- Sew the sides. Fold the felt in half by sticking the right sides together, pin, and sew each side.
- Mark the bottom. Measure 1 1/2 inches from the point of the fabric with a regular ruler. Draw a line perpendicular to the seam.
- Sew and trim the bottom
- Make the handles. Take the small felts, pin them at the place of the handles.
- At the top of the tote bag, measure 2 inches from each seam and make a small mark. Hold the end of the handle to line up with the top edge of the tote bag and pin in place. Make sure your handles are not twisted. Line up the outside edge with a marking.
- Repeat for each handle.
- Sew the top edge of the bag. Give 1-inch allowance to secure the handles in place.
- To finish your tote bag, fold the edges on the top and stitch together to take the smooth look that you like.
How do you find the process? You only require some basic sewing skills in order to make proper stitches to your bags.
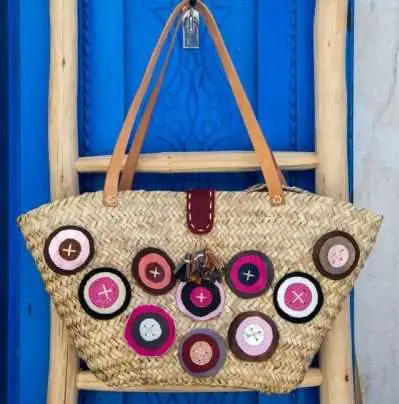
DIY Wicker Purse From Placemat
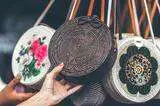
If you choose the right color, a wicker purse from a placemat can be beautiful. A wicker purse can be a great purse to bring with you during spring. It is about a cheap craft that doesn’t require many materials.
You can create your own purse in zero time; the steps are super easy.
- Take your placemat and start by folding in the sides.
- Fold the bottom flap-up.
- Use a set of clips to steady your folding for a bit. It usually takes 5 to 10 minutes)
- Sew the side edges from bottom to top, or choose a rivet tool kit, to tightly sticks your folding together.
- Sew-on snaps, or as a safer option, choose magnetic snaps.
- Attach your pom-pom grim by using glue. Secure the trim on the opposite side so that the little pom-poms hung down the front.
- Add some clips again, and place something heavy on top (e.g., a set of books) for a couple of hours.
- As a strap, you can choose any type of chain with a small swivel hook and clamped them onto the sides.
Wicker purses from placemat can be a profitable DIY handbag idea. People always look for new designs to buy, and everything handmade is in high-demand.
DIY handbags are useful and profitable
There are several DIY handbag ideas to make money. Make and sell a DIY bag made from old jeans, paint a shopping bag, and sell it as a unique product or create a DIY wicker purse from a placemat. DIY handbags are definitely a profitable craft to sell and fill your pockets.
However, don’t forget that if you learn how to make your handbags, you can also save some money from your purchases and always stay fashionable.
If you enjoyed reading this article, don’t forget to check on ”DIY crafts to make money” and get ideas on more crafts that can help you make money.
