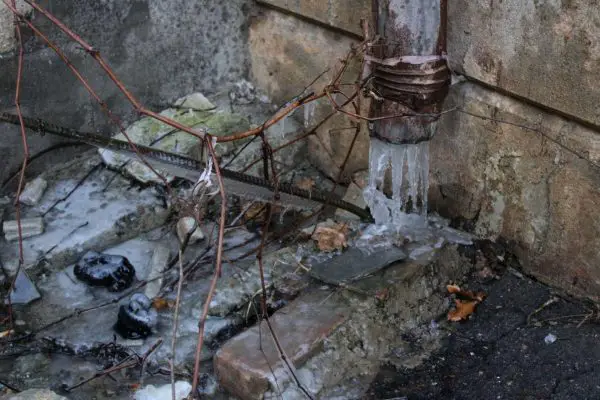
If you reside in a cold region, you’re probably no stranger to burst pipes and plumbing issues during the winter season, especially outdoors. When water freezes inside a pipe, the ice expands due to the increase in pressure, resulting in furious flooding caused by cracks and bursts. If you’ve experienced this type of water damage on your property, then you know why’s imperative to prevent it from happening again.
So, if you don’t want to spend hundreds or even thousands of dollars on plumbing, you need to ensure your pipes are protected through proper insulation, preferably before the season starts by hiring a plumber or restoration expert to thoroughly inspect your lines. However, if you’re not looking to burn a hole in your pocket, you can opt for DIY pipe insulation and take on this simple project without professional intervention.
If this sounds intriguing to you, keep reading as we’ll share a complete guide on how to insulate outdoor winter pipes during winter using three different insulation materials.
DIY Pipe Insulation Materials and Methods
Pipe insulation is inexpensive and does a decent job of protecting your plumbing and valves from winter temperatures. So, if you’re ready to summon your inner Super Mario, here’s how to insulate outdoor water pipes during winter:
Materials/Supplies
- Duct tape or adhesive (glue)
- Insulation of choice (Outdoor faucet cover, pipe-wrap, pipe sleeve, etc.)
- Spray foam
- Foam caulk rope
Method 1 – Foam Pipe Sleeves
Installing foam pipe sleeves is the simplest way to insulate outdoor pipes. However, this solution is recommended for long and straight uncovered-inch pipes. You can easily find foam sleeves at a local store or online in increments of six feet and range in diameter, depending on your pipe size/diameter, e.g. ½ inch x 3 ft.
Steps
- Carefully position the foam pipe sleeve along the pipe and measure how much you need before cutting it accordingly.
- Open the sleeve slit and wrap it around the pipe.
- Next, seal the seam by wrapping duct tape around it after small intervals or using a powerful adhesive like super glue.
Method 2 – Pipe-Wrap Insulation
Pipe-wrap is relatively easy to install, especially for DIYers who have taken on plumbing projects before. This solution is highly recommended for insulating small pipe lengths. Pipe-wrap is made from different materials, such as flexible foam with rubber backing tap, bubble-film, foil-backed cotton, rubber, and even fiberglass, to name a few. Therefore, you have plenty of options depending upon your location, budget, or preferences.
Steps
- Start by attaching the loose end of your pipe-wrap of choice on one end of the pipe.
- Make sure you carefully wrap it around the pipe in spiraling loops so you cover all of it without any gaps.
- Once you’ve reached the end of the pipe, use scissors or a blade to cut the end off, and you’re done.
Method 3 – Outdoor Faucet Covers
Another great way to protect your outdoor faucets during the winter is by buying and installing a hard foam faucet cover. This not only prevents it from freezing and cracking but also falls ice chunks from your roof. If you live in a cold region, you can easily find this plumbing accessory in local hardware stores. Alternatively, you can order from Amazon or other sites.
Steps
- First, make sure you detach your hose from the faucet and safely store it in your shed, attic, or garage.
- Next, carefully place and fix the rubber loop over the spigot and make sure it’s tightly attached to the surface. You can use an adhesive just to be safe.
- Once the rubber loop is fixed, position the faucet cover over the spigot, tighten the slide lock to hold it in place, and make sure there aren’t any air pockets.
More DIY Tips to Prepare Your Outdoor Plumbing for Winter Months
The following are some proven tips to prevent a watery disaster from affecting your property’s structural integrity and draining a massive hole in your pocket:
Disconnect Your Hoses
The first thing you should do is when preparing your plumbing for winter is disconnect your garden or backyard hoses from the faucets and drain them completely. The last thing you want is for them to snap is to leave them attached to the outdoor faucet partially filled water as this can cause holes to develop and ultimately weaken the hose’s lining. Therefore, you should store them inside your garden shed, garage, basement, or attic during the winter months.
Close the Shut-Off Valves and Drain Your Faucets
Another great tip is to close the shut-off valves for your outdoor faucets from the main supply since you won’t be needing them for the winter months. Once you’ve closed them, open the faucet and drain any residual water out of the pipe so there’s little to nothing inside to freeze. Doing so will also create an air space within this pipe section to give any remaining water more room to expand so it doesn’t crack or burst the pipe.
Schedule Sewage Cleaning Before Winter
Wastewater and debris stuck in the secondary sewage lines that are either above the ground or not buried deep enough can increase the chances of cracking upon expansion during the winter months. Moreover, landscape drain lines are even more susceptible to freezing so you should proactively call a backup service to clean out all the lines (including the mainline) before the winter rains and storms.
Repair Any leaks
If you have any pipe leaks you’ve been putting off for a while, you should have them fixed before the winter season before the problem escalates and results in flooding or other forms of water damage. There are many DIY ways to fix minor leaks, such as using epoxy, a pipe clamp, or a slip coupling.
Conclusion
And there you have it – three simple and inexpensive DIY pipe insulation methods you can use to ensure your outdoor water supply lines don’t freeze and cause the pipes to crack or burst during the winter months. By learning how to insulate outdoor water pipes yourself, you can save hundreds of dollars on labor costs and become more self-reliant. You can also lookup some pipe insulation videos on YouTube before getting started and follow the instructions as you watch them. However, no matter what type of insulation you choose, you need to keep an eye on your pipes to ensure the protecting holds and call a professional as soon as you suspect something wrong, such as rumbling noises or no water coming out of the faucet.
So, what are you waiting for? Head to the nearest hardware store or order everything you need online to get started.