Is your entryway getting crowded, and there is no space to hang or place any of your coats, mittens, hats, and other accessories?
When wintertime approaches, one of the biggest problems at entryways becomes the lack of space, especially when guests come around. Luckily, there are some ways to fix that. The best solution to this problem is to have a coat rack. And the good news is that you can build a coat rack at home through a few simple steps.
You can easily build a wooden coat rack from scratch if you have the right supplies and the know-how. This guide on how to build a coat rack will help you with just that. Keep reading this detailed guide to help you get started.
Why Build a DIY Coat Rack?
There are multiple benefits of building a DIY coat rack. The most significant one is that it is a rewarding experience to build something from scratch with your own hands; that too is a coat rack, which can be quite practical. You can use it to hang your coats, hats, bags, and any other items you need when on the go.
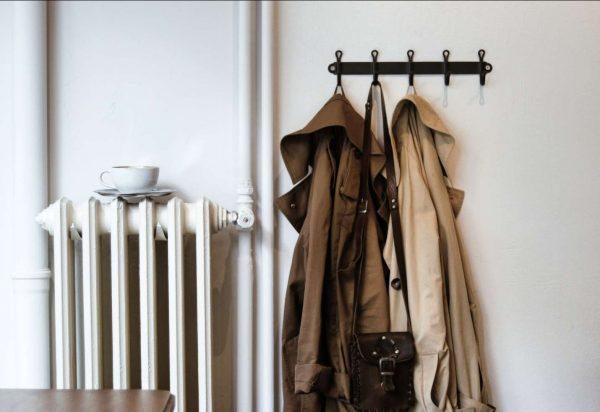
Truly, a coat rack is one of the most practical and useful items in a home. And when you can make one from scratch, it can be even better. You can make a few and install them in your closets as well to create extra space!
Some of the other benefits of building your own coat rack include:
- It is much more affordable than buying one
- You can customize it however you want
- It will free up your closet space
- Will make your entryway more functional and visually appealing
- You choose which material to use, which can make the coat rack more durable and sturdy
- It has a sophisticated design
- Will reduce clutter in your entryway and closet
How to Build a Coat Rack
Before you begin building a coat rack, you must know that it requires the use of a drill and handsaw. If you don’t have experience handling these tools, you might need to learn more about them first or let an expert take this part.
Additionally, always ensure that you wear the proper safety gear when building a coat rack. You should be wearing gloves, safety glasses, and a mask.
This DIY coat rack is extremely easy to build on your own. It will hardly require a few hours if you already have all the supplies on hand. You can even apply a varnish or paint to the coat rack to match your room’s overall aesthetic. All in all, if you are wondering how to build a coat rack, then keep reading this detailed step-by-step guide:
Supplies You Need
Here are the supplies you need. It is best that you get all of them before starting your DIY project because this will save you time and hassle.
- Lumber or any other type of wood
- Two screw eyes
- Ruler or measuring tape
- Pencil
- Palm sander
- Handsaw
- Stain or paint
- Clamps
- Sandpaper
- Linseed oil or any other varnish
- Hooks
- cordless drill
- Hammer
How to Build a Coat Rack: Step-By-Step Guide
Once you have all of the supplies ready, you will need to follow these steps to building a homemade coat rack:
Step 1: Trim the Board
The first step in building your coat rack is using the lumber and cutting it into a smaller piece of seven feet. Although this is the typical size of a coat rack, you can customize it according to your needs and preferences and based on the size of the door frame and the wall.
For this process, you will need to use a saw. If you have never used a saw before, you might need to learn first. Otherwise, get it cut from a professional. Most hardware stores make the cut on the wood for you for free.
You can use any type of wood to make your coat rack. However, make sure it does not contain any sharp edges, nails, or other hardware. Those can be dangerous, especially while cutting.
Step 2: Mark Where You Will Make the Cuts
Once you have a clean-cut board for your coat rack, it is time to mark where you will make the cuts for the hooks. For this, use a ruler, measuring tape, and a pencil. The hooks should be at an equal distance from each other. They should preferably be five inches apart. Once you have marked each spot for the hook, you will also know how many to buy.
Step 3: Drill the Holes
Now, you need to drill pilot holes at each of the areas you have marked with a pencil. You will need to use your cordless drill for this process. Make sure that each of the hook’s locations is centered on the wooden rack. Moreover, ensure that the holes are smaller in diameter than the hook screws.
Step 4: Attach the Hooks
The next step is quite easy; you will need to attach the hooks to the rack through the holes you had drilled earlier. You can do this step now, but it is better to add these hooks after painting and sanding the coat rack.
Step 6: Add Finishing Touches
It is now time to add the finishing touches to your coat rack. How you finish it entirely depends on the overall décor of the area you install it on. However, whichever way you add these touches, ensure that you first sand the rack. This will remove any harsh edges and make them smoother.
You should then give your coat rack an attractive finish or paint. You can either apply a finish, such as a linseed oil, which will bring out the natural color of the wood. It will make it appear raw but alluring simultaneously.
Alternatively, you can also consider applying a layer of paint to the coat rack. Use a paintbrush to apply the color of your choice. Let the color dry, and then apply a finish to give the coat a vibrant shine.
Lastly, you can even stain the rack if you want it to look woody and rustic. Use an interior stain and apply it with a piece of wool or cloth. Allow it to penetrate the wood, after which you can decide how many coats to add. One coat will give it a light stain, while multiple coats will make it darker.
Whichever method you take to finish your coat rack, you must ensure that you lightly sand it with 120-grit sandpaper in between each coat if you plan to apply multiple coats and layers.
Step 7: Secure the Rack to the Wall
Let the finish and paint on the coat rack dry for a few hours. After that, your coat rack is completely ready. The one last step is to secure and mount it on the wall. You should do this by drilling into the wall studs. But first, mark the spots on the wall with a pencil.
Alternatively, you can also use wall anchors if you don’t have the option of drilling directly into the wall, whichever is readily available and easier for you. Use a hammer to drive the anchors into the wall. Moreover, if you don’t want the screws to be visible, you can countersink them and then use wood fillers and paint to cover them up.
Then, it is time to secure the rack on these hooks or screws. Drill the holes in if you are using screws, and then install the rack. Or, if you are using anchors, securely attach the rack onto the hooks.
Final Thoughts
This is the end of our guide on how to build a coat rack. By now, you can already tell how simple, easy, and quick the entire process was. Through this guide, you will have assembled a sturdy, aesthetically pleasing, and practical coat rack that you can secure in your closet or the entryway.
Since building a coat rack does not require a large investment, you don’t have much to lose, even if this process goes wrong. However, the best part about this is that it is quite simple to make, so the chances of you messing up are minimal.
You can also choose to customize this coat rack whichever way you want. You can paint it to match the décor of your house or give it a rustic look by enhancing the natural shade of the wood it was made with. Truly, the possibilities to be creative with your coat rack are endless.
So, you really don’t have any reasons not to give this super easy and fun DIY project a try!
