Making DIY jewelry is a creative and productive hobby, but it is not only that; it can become a profitable business that will bring plenty of extra cash in your pocket. Buying jewelry can be quite expensive. The prices are pretty high, even if we are talking about low-quality jewelry made by cheap fake materials.
Making your own jewelry will save you a lot of money. However, it is not only about making something at a lower cost or sell a profitable object. By crafting your own pieces, you can match them to your personal style and taste.
All you need to start your jewelry business is to learn a few techniques, and then you should be able to create unique styles of jewelry sets, earrings, bracelets, and many more.
You may feel that you need specific knowledge for making jewelry. However, the steps are easy and simple.
How to start making DIY jewelry?
Every beginning is a challenge! You need to make a small investment in order to find a profitable hobby.
1.Purchase jewelry making tools
Depending on the type of jewelry that you want to make, you will need some essential tools for your project. However, you don’t need to be stressed. It is hard to find the correct tools from the very first time. That’s why we made a list for you with the essential tools for a beginner.
All you need is:
- Some different shape pliers: bent closing pliers, round nose pliers, step jaw, and chain nose pliers.
- A ruler which measures centimeters and inches.
- Of course, a good wire cutter.
- A wire for practicing. Before you start, you need to find your techniques and your shapes. So, invest in a cheap practicing wire.
- Peg boards for playing with the wire.
2.Choose your specific DIY jewelry project.
You can buy a wide variety of jewelry pieces (beads, wood, wire, string, paper). That’s why, firstly, you need to pick up the materials that you want to work with.
3.Buy a jewelry kit
There are plenty of jewelry kits to choose from. Go online or to your local shop and select the one that suits you the best. Jewelry kits provide you with different supplies and allow you to create multiple pieces and shapes. Most of the DIY jewelry kits come with some general instructions, tips, and ideas.
4.Purchase DIY jewelry supplies
Making DIY jewelry requires some specific supplies. You may have plenty of options on shapes and materials, but few basic supplies are used on most handmade jewelry pieces.
Consider purchasing some:
- Beads
- Jewelry wire in regular sizes (18, 20, and 22)
- Closures and clips
- Jump rings
5.Learn some basic techniques
It is important to learn some skills and techniques to complete your project successfully. Some of the required jewelry-making skills include opening jump rings, cutting wire, wire working, stringing, and using jigs and pegs.
To learn those different techniques, you can either read jewelry-making books, search for tutorials, go on workshops or go online and search for any kind of jewelry you want to try making.
6.Practise your techniques before making your DIY jewelry pieces.
Conquer a technique is a must before you start cutting and bending your more expensive wire. Lots of repetitions will lead you to make a high-quality piece that everyone will love. Remember: thin, copper wire is always the right choice for practice wire.
But enough with the tips and the techniques. Let’s move on to the fun part.
Innovation and quality are a must if you want to create a successful DIY jewelry business. That’s why we are here to share with you some unique ideas to add to your jewelry collection.
Are you ready to create an incredible piece of art on your own?
Simple Macramé Necklace
Boho jewelry ideas are a must during the last years. It is about easy and unique DIY jewelry to make and sell.

- Fold the strand in the middle. Fold it some more times until you have a folded bundle measuring 19.
- Cut the loops at the end in order to have two separate pieces.
- Take a strand, fold it in half and place a split ring over the strand. Bring the one tail over the ring and after under through the split end. Pull the split ends simultaneously to tighten up.
- Repeat five times, and create 12 strands of hemp.
- Create your knots by using four strands together. Repeat with the rest of your strands.
- If you go by doing square knots, you will end up with a spiral knot.
- If you like it, you can add some beads while doing your knots.
Tassel Necklace DIY
If you want to create something fashionable, and easy Tassel Necklaces are the right choice. It is about unique jewelry that can be made in many shapes. Do not forget that women absolutely love them. It is jewelry that suits multiple outfits, and you can wear it on any occasion.
Step 1
Cut a 3″ piece of brass wire and bend it into a pin. Fold the skein of embroidery floss in half and slide the hairpin into the fold.
Step 2
Twist the ends of the wire and slide it through the bead cap. Wrap the wire’s ends back around its neck two times, and then trim the ends. Remove the paper and cut the bottom of the tassel to make it even.
Step 3
Cut some inches from the thread. Thread the beading needle, and knot the end. Sew at the top of the tassel, then back through it.
Step 4
Wrap around the top and then sew through its top. Tie a knot and trim.
Step 5
Open the jump ring and put the last loop inside. Close the jump ring.
DIY Leather earrings
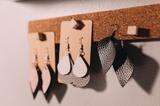
Using leather for jewelry is innovative. Not many people can think of leather as something classy. However, there are plenty of elegant ideas to create a leather pair of earrings.
Materials
- 2 pieces of leather
- ear wire
- jump rings
- knife
- awl
- paint pen
- ruler
- cutting mat
- flat-nose pliers
How to do DIY earrings?
- Cut out the leather
- Draw a chevron design
- Cut two more chevrons on the same shape but in different color.
- Paint the white chevron
- Line up three chevrons in a row and punch holes in their tops and bottoms.
- Open a jump ring and wire it through the chevron’s holes.
- Open a new jump ring and slide it through the middle chevron.
- Take the ear wire, open the ring and slide it through the hole in the top chevron.
- Repeat on the other piece.
There are many more ways to make leather earrings, but this is a simple one that can save your day. If you want to be creative and make a fashionable set of earrings, that’s a sure and cheap way.
DIY Pearl Drop Earrings

Many of us love pearl drop earrings. It is a fashion during the last years as they are giving a classy style to any look. Pearl drop earrings are full of femininity and elegance. Every women love them! So, if you want to become a successful DIY earring maker, pearl drop earrings are an excellent start.
Materials
- 0.5mm golden wire
- Glass) pearls
- Golden earring hooks
- Round nose plier
- Wire cutter plier
- Side cutting plier
Steps to create Pearl earrings
Step 1
Cut the wire and slide it into the pearl. Wrap the pearl into two wire ends and wrap the short end around the long end. Make a messy wrapped loop and the long end.
Step 2
Attach the ear-hook to the loop.
Step 3
Enjoy your earrings
Have you ever seen an easier craft to make? Pearl earrings are easy and profitable. You can sell them everywhere online.
DIY beaded ring

A beaded ring may seem weird. However, it is quite usual, and women love them. Beaded rings can be made in many shapes and colors and can match at any taste.
Can you imagine how easy it is to make a beaded ring on your own?
All you need is small beads, nylon fishing line as thread, and some bead glue.
-Slide the beads into the fishing thread. Start with approximately 10 to 12 inches of cord.
-When you have three beads on your thread, hold the two edges of your thread and allow the beads to fall in the middle.
-Add a fourth bead but not let it slide on the top of the other bead. Instead, grab the other end of the ring thread, and slide it through the top of the bead.
- Pull your threads in opposite directions to string the bead into place.
- Your fourth bead will act like a bridge.
- Continue by adding your beads.
- Connect the ends of the ring by adding some glue.
It may seem hard to do it, but all you need is to make a trial ring to understand all the processes. It is a lot easier than it looks, and it is going to bring a fair amount of extra cash on your pocket.
There are plenty of ways to expand your DIY jewelry collection or business. All you need is to fill your mind with new and unexpected projects. Don’t fall behind, creativity is the key.
If you enjoyed reading this article, don’t forget to check on ”DIY crafts to make money” and get more ideas on more crafts that can help you make money.
