
So you’ve finally decided to build your do it yourself inground pool. Excellent! It’s about time you treated yourself to the lush life!
But where do you start? The first step is to find a good design, sure. But what then? If your first thought was “decide a budget,” then you’re on the right track. We all know inground pools can cost a fortune. We’re talking up to $10,000 just for the installation.
Fortunately, you can save up a lot by handling the project yourself. That’s right, a do it yourself inground pool will save you on labor and crew costs. That isn’t to say it’ll be cheap. But cheap comparatively.
To guide you through the process and hopefully make it easier, here are three of the best inground pool designs that you can make yourself.
We’ve also listed down a few common problems that may deter you from doing the project yourself.
Do it yourself Inground Concrete Pools
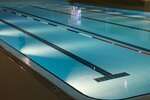
Inground do it yourself concrete pools are by far the hardest to build. They require more manual labor and might need the help of heavy machinery that you will either have to rent or borrow.
Step 1: Start Digging
The first step to building your in-ground pool is to begin excavating.
For this, you’ll need an excavator. You can rent an excavator for a few days. Or you can hire a contractor that will take care of the excavation.
You should also have someone haul the dirt off as soon as possible. Next, level the hole with your level and rake/shovel.
Step 2: Build A Rebar Grid
After digging and raking, you’ll need to make your rebar grid. It’s quite a lot of work, but it’s an essential step that gives your pool tensile strength. As such, do not skip it at any cost.
Follow the gridding plan mentioned in your blueprints, then start laying down the rebar. You may need to cut it using the right type of saw. You’ll also need to tie your rebar off with metal ties.
Step 3: Lay Down the Hookups
Next, you’ll need to lay down your main hookups, such as your plumbing and wiring. Follow the design mentioned in your plan and stick to it.
If any openings in the pipes must remain open, you should temporarily cap them to prevent them from clogging when you pour the cement.
Step 4: Apply the Concrete
Now you can start by applying the concrete. Mix the concrete on-site in the recommended ratio. Then spay it around the side and the bottom of your pool. Be sure to wear protective equipment as this part can get messy (and loud too).
You must wait for the concrete to fully cure (typical curing times vary from 27 to 28 days). You’ll need to spray some water on the concrete twice or thrice each day during that curing period.
Step 5: Add the Waterproofing and Finishing Touches
You’ll need to use a sealant that will keep the water from slowly eroding the structure for waterproofing. You should also apply a waterline tile that protects the edge of the pool from any unwanted staining.
Also, consider the design of the coping and the patio. The coping is the area right around the edge which seamlessly transitions into the outside deck. For the patio, the materials and designs are at your leisure.
Step 6: Start It Up
Before filling the pool, consider any substances that are currently curing, such as plaster or glue.
Start filling the pool up with water using any suitable water source. Make sure the water is balanced. There are many ways to do so, but avoid using chlorine for the first 48 hours.
Also, you’ll need to brush the pool twice a day for about 10 days to remove any plaster dust. Don’t swim in it before you do these things.
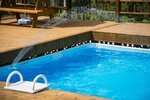
Do it yourself Inground Vinyl Liner Pool

While concrete pools are certainly stronger, they cost a lot to make yourself, both in expenses and labor. With a vinyl liner pool, the task is made much easier since kits with all the materials you need are readily available online.
Step 1: Excavation and Digging
Start by acquiring the necessary building permits. Then, excavate the area you want to build your pool in. Excavation will require an excavator to either rent or hire a contractor to do it for you.
Next, carefully level the floor using any suitable digging equipment (such as a trowel). Make sure it’s level before moving on to the next step. Be sure to follow your design, as most pools will have steps and deep or shallow ends.
Step 2: Wall Panel Assembly
Once you’re done digging, you’ll need to start the wall panel assembly. Tour do it yourself inground vinyl liner pool kit will already include either polymer or steel wall panels. You’ll need to line them up against the pool’s walls and secure them using the included braces. The steps or stairs are also assembled in this step.
Step 3: Lay Down the Concrete Footing
Now, to provide support, you must build a concrete footing. Most plans require you to pour concrete around the external perimeter, typically eight inches deep. This whole process should take you about half a day, but be warned: it will get messy.
Step 4: Hook Up the Pool
And now it’s time to install your hookups. Your hookups include any wiring for lights and heaters as well as any plumbing for draining, filtering, and skimming. Simply lay down the required materials mentioned in your plan. Be sure to let the concrete dry first.
Step 4: Liner Base Installation
The next step is where the liner comes in. But before that, you need to build the base. The base is normally made from either vermiculite or grout. Simply mix it in the recommended ratio and use a trowel to settle it in place. Again, make sure it’s level before continuing.
Step 5: Liner Installation
To install the liner, you’ll need to mount a track along the top of the wall panels. Take a close look at your liner. It has a bead-like ornament that can be snapped into place into the track. Start by placing the liner all along the pool’s sides, then lock it by snapping the bead in place.
You’ll need to vacuum behind the liner to form-fit it to the pool’s shape. You should also use a flat roller to remove any visible wrinkles.
Step 6: Patio, Coping, Water, And Finishing Touches
At this point, you should start filling the pool with water. This will keep the liner in place. Then cut out the necessary holes for the skimmer, lines, pipes, drain, and the like. Now fill the pool with water, install your patio and coping like you normally would, and clean the water before use.
Do it yourself Inground Fiberglass Pool
Fiberglass pools are the easiest to install since they come pre-made. You just need to lower what’s called the “shell” into the site you dug up. Of course, there’s a lot more, such as the plumbing and the backfill. But the entire process is a lot easier than with any other pool.
Step 1: Excavation and Digging
This should be a no-brainer by now. You need to excavate the site and dig it up. For this, you’ll need to hire an excavator or rent one and operate it yourself (only if you’re licensed to).
One important step that most people feel lazy about is leveling. Leveling the pool site is important, especially with a fiberglass pool. Take your time to level the pool, even if it takes a few days.
Step 2: Lower the Shell
The next step is to lower the shell of the fiberglass pool. These come pre-made, so there’s not much you need to do. If your pool is too big or you don’t have a crew to help out, you may need a crane. Like with the excavator, you’ll need a license to operate the crane. Or you can hire a licensed professional to do it for you (which is highly recommended).
This is where you need to ensure that the pool is level. If it isn’t, there will be unbalanced stress on the pool’s uneven parts, which may cause the shell to crack.
Step 3: Install the Plumbing
Since the shell is already in, most of the plumbing will either go around the pool or between the shell and the pool wall. Follow the plan mentioned in your design and work accordingly. You’ll need to install plumbing to pump up water, drain it, clean it, and refill it. You’ll also need to install the necessary lighting wires (if any).
Step 4: Pour the Backfill and Water
The backfill is the stuff that goes between the shell and the wall of the site you dug up. Pouring the backfill will no doubt put some pressure on the shell, which may crack it. The same will happen when you pour the water. What you want is to pour the water and the backfill simultaneously to equalize the pressure.
This is the trickiest part, and like with the leveling, take your time. Hire an expert for this if you want.
Step 5: Coping, Patio, and Cleaning
Now that your main pool is done, you can start building the coping and patio. The coping is the material that “caps” the pool’s edges. The patio is the rest of the material that continues from your coping and integrates into the rest of wherever you made your pool.
Once that’s built, you should begin cleaning the water. You want to maintain pH-balance for both safety and aesthetic purposes. Avoid swimming in the water at all costs until it is fully cleaned.
Do it yourself Inground Pool Problems
Making your pool can save up labor and builder costs. But sometimes, you may end up paying more in the long run. Here are a few common do it yourself inground pool problems:
No Warranty
When you hire a builder to make your pool for you, they give a certain warranty. If they make a mistake during the construction, they’ll either fix it or return your money. When you do it yourself, however, you deal with the problems head-on.
Limited Time
Since you’re turning a crew-job into a one-person-job, it’ll take you a lot of time, especially if you have other stuff to do. In some cases, waiting for more than you should damage the materials or render them useless.
Strenuous Labor
We can’t stress this enough. Don’t “do-it-yourself” if you can’t do it yourself. Building a pool requires a lot of labor. Even the leveling will require a few days’ works. If you’re not fit for physical labor or don’t want to do it, hire a crew where you can.
Little to No Insight or Guidance
Lastly, you have no insight or guidance. Well, yes, you do have this guide. But there are a lot of aspects to pool building. And if you encounter a problem, only an expert can tell you what’s wrong in your specific case.
FAQ
How Much Does A Do it yourself Inground Pool Cost?
The cost depends on the type of pool and how often you’re hiring a construction crew. Just an excavator rental will cost you $2,000 a week. A crane would cost you about $400 to $800. The material and plumbing will cost you below $2,500. Expect total spending of about $10,000.
What Permits Do I Need for A Do it yourself pool?
You’ll need a construction permit for your site along with any licenses for operating heavy machinery. Depending on where you live, you may need to get multiple permits from separate entities. You may also need plumbing and electrical permits. You can avoid acquiring those yourself if you hire trained professionals who already have those.
Which Inground Pool Is Better: Concrete, Vinyl Liner, Or Fiberglass?
Concrete pools are the most expensive to build and maintain, but they offer a lot of flexibility in shape and design. Vinyl liner pools also provide the same flexibility, but the liner can tear easily. So, repair and maintenance will be a concern.
As for fiberglass pools, they’re the easiest to build. But since they come pre-made, your options are limited. Plus, they’re easy to crack even with imbalanced pressure.
Conclusion
Building a swimming pool is no easy job, especially considering the costs that come with it. Luckily, you can cut down on labor costs by building your swimming pool yourself. Of course, this means you’ll be doing the labor yourself.
As with most DIY projects, a do it yourself inground pool will never be as good as the professional thing. This is why it’s highly recommended to hire a construction crew with experience with building pools and let them do the work for you.
But if you want to do it yourself, estimate the costs beforehand—research into the rental costs of heavy equipment. Talk to someone who’s done it before. If you cannot afford it, there’s no point in starting it and leaving the project halfway.
And as always, don’t forget to estimate running and maintenance costs. You can expect to spend upwards of $10,000 on the initial construction.
