Various aspects are associated with these do it yourself retaining walls that you can completely install on your own without any professional help. But you need to have some prior experience to pull it off.
Anyone having a strong back can stack them up and build a nice-looking retaining wall. But you will need some fundamental skills and planning for building a wall that can handle intense pressure and fend off the forces of nature for long.
It’s all about proper drainage, sturdy materials, a solid base, and some valuable tips that we will show you in this guide, so keep reading.
How to Build a Do it yourself Retaining Wall?
Here’s step-by-step guide for building your do it yourself retaining wall.
Sizing the trench

First of all, you need to decide how wide you should do it yourself retaining the wall. According to the size you have in mind, you need to make the trench and hold the blocks with an 8-inch space behind them.
It should be deep enough to bury a single course along with the base materials completely. And its thickness must be around 6 to 8 inches. Just make sure to level it all out to prevent the wall from tipping over, especially after those thaw cycles.
Compacting the trench
To compact the soil inside your trench at its bottom using a hand tamper or a compactor with a vibrating plate. You have to be careful as the hand shovels can loosen the soil, making the bad wall settle.
Laying a base of crushed stone
Using crushed stone for a do it yourself retaining wall can be a bit expensive. But it will ensure better drainage due to the harper angled stones. They can stay that way once you are done crushing them. The size of these crushed stones can range between 0.5-inch to 0.75-inch for best results.
Choosing the retaining wall blocks
The traditional blocks are heavy, but you can go with the hollow and lighter blocks as well. However, cutting them will expose those voids. Also, some blocks need individual backfilling, and it’s much too time-consuming.
You can go with the ones that have pins at the bottom because they can work better. They also do well on tighter curves, and stacking them is much simpler. If the ends of your blocks are visible and you want to match that rough surface, you can always use a block splitter.
You can also use a saw to make those smooth cuts. The cutoff saw will work better and needs to be gas-powered. It can cut with or without water. Water can keep the dust under control, but it will create a slurry that will mess things on your sidewalks or driveways.
You can mark your cuts by using soapstone pencils or crayons. The marks with grease pencils can last longer, while rain can wash away the soapstone markings.
Getting your first course right the first time
To do it for the first time, you need to use a torpedo level for leveling each block from front to back. It can be 4 to 6 feet to keep all the courses even. Use a heavy plastic or rubber mallet for setting the blocks. You need to level it out because it forms the foundation layer, and the remaining layers will be resting on it.
Sweeping before you stack
You have to sweep clean the surface before you start stacking. Even a small pebble can misalign the entire wall. The crooked block will affect the level of the one above it. And you might end up with a bump right in your top course.
Stepping up after a couple of courses
If your wall is going uphill, carry on with each of your courses into the hill right until the second course is leveling with the grade. Start your second base course from that point.
Setting up the drainage
Drainage of your retaining wall is critical. So, you need to get it done right after you have stacked up a few rows. You can backfill your wall using a rock in front of it. Lay the perforated drainage tile right on top of that rock.
Install those tee fittings of your drainage and the drain grills with a gap of 25 to 50 feet. You can do it based on the estimate of how much rainwater you will get. You can cut a block down to accommodate the grate. After that, screw the drain parts and cover them with rock.
Staggering the overlaps while keeping it tight
Staggering the overlaps and keeping the joints firmly together is very important. Any gap in between can create water or sediment passage. Just follow the instructions from the manufacturer of these blocks to make it right.
Aligning the capstones
After staggering, now, it’s time to align the capstones. You can do so with the help of landscaping block adhesive because it can stay very flexible over time. Just make sure to keep the blocks dry before you apply the glue. You can overhang a capstone about 1 to 1.5-inch for proper guidance.
Top 5 Retaining Wall Ideas

Are you looking for some inspirational ideas for your do it yourself retaining wall? Here are a few to get you started.
1. Terracing your backyard
You can use large-size modular blocks made of stone for leveling a steep decline and carve some distinct areas for game playing, cookout, or entertaining. It is a wonderful way to create your own space; if you don’t have terraces.
2. Carving out your patio
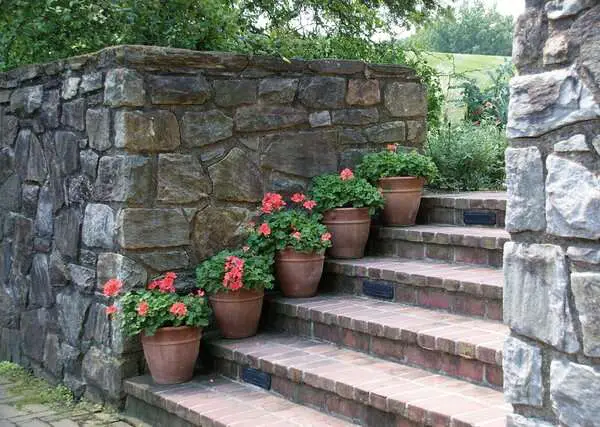
If there is a slope right behind your home, you can line the edge using interlocking blocks made of concrete and make a patio with a sitting wall. You can always add some flowers and other plants to make it look enchanting.
3. Transitioning area to your sidewall
For this, you can use the blocks and make a wall with them and fill it with lots of flowers and greenery. It will create a buffer right between your front door and sidewall and will look extraordinary.
4. Creating a driveway
You can raise the grade in your yard and build a hybrid wall of timber and stone for holding up your new gravel drive. It will look stunning and classy because of the wood hints and strong because of the stones.
5. Tiered retaining walls
For tiered retaining walls far enough back for preventing any pressure or weight from the wall above and collapsing the wall below. Just separate the wall tiers by a distance at least twice the height of the walls down. For example, if your bottom wall is around 4 feet tall, the wall over it needs to be 8 feet behind it.
Top 5 Don’ts of Building Retaining Walls
Want some advice on what are the mistakes that you need to be careful of and avoid? Here are the top 5 don’ts of building retaining walls.
1. Don’t forget to check with your community guidelines
These retaining walls affect water’s natural flow. They can also impact your neighbors as well. You might need permits before you start any construction on your property.
2. Don’t lay your blocks on an uneven surface
Your first course of blocks will set the tone for the rest of them. If you don’t sweep it properly, any sediments, rocks, or debris may cause the second course to bend slightly. It might become more visible until you lay down the top course.
3. Don’t forget about the drainage system
Allow some clearance for the drainage system to go in. It makes your wall last for a long period while still handling mother nature very well.
4. Don’t backfill incorrectly
Once your drain pipe goes in, you have to drain all the remaining area properly. Add it either with pea gravel or sand. You have to do this correctly. Else, the drainage system won’t work because water will have other places to enter.
5. Don’t go for a tall wall when you can tier it
Long tall walls are suitable for professionals to build because they are a lot more technical than building shorter walls. Therefore, for a do it yourself retaining wall, choose to go with tiers.
How to set up retaining wall drainage?
Setting up the drainage for your retaining wall is very important. It will take care of all the water that your wall will be exposed to. Once you have stacked in a couple of rows, start backfilling your wall with a rock to match the height of the grate.
After that, you need to lay down your perforated drainage tile right on top of the rock. It’s time to install the fitting of your drainage system. And it needs to be in the place every 25 to 50 feet based on the size of your retaining wall and rainfall it will have.
You can cut out a block for accommodating the grate for drainage. Now screw in the drainage tile parts cover them with rock.
Which retaining wall blocks are best?
Solid retaining blocks can be quite heavy, and you may think of a lighter and hollow one. But don’t go that way because they might be easier to move around, but cutting or splitting them will expose their voids.
Some hollow blocks also need individual backfilling, and that can take a lot of your precious time. Versa-lock blocks are best in this regard because they come with pins instead of a lip. With these pins, you can easily fix them together and build tighter curves. Lips are also prone to cracking, but that’s not the case with pins.
FAQ
What is the easiest retaining wall to build?
With an average do it yourself experience, building aretaining wall is the easiest when masonry blocks are used. You can stack them no taller than 3 feet. You shouldn’t use mortar or stones.
What is the cheapest type of retaining wall?
The cheapest material you can go for building your do it yourself retaining wall is treated pine. They are easier to handle, especially if you compare them with concrete or stone walls. But they are not that durable to last for decades.
Is there a replacement of a retaining wall?
You can use those reinforced soil slopes, which are easy and quick to construct and feature a kind of geotextiles like polypropylene or polyurethane. This geotextile locks the existing soil into its place and reinforces it.
Is drainage required behind the retaining wall?
Yes, you need drainage behind your retaining wall, especially if it will experience a lot of exposure to water. If you don’t address this issue, it will start causing hydrostatic pressure right behind your wall and crack or bulge it.
What kind of stone do you put behind a retaining wall?
You must go for twelve inches of gravel or a similar aggregate granular backfill right behind your wall for proper drainage. Use compacted native soil to backfill the rest of the space.
How long do retaining walls last?
Concrete walls, if properly installed, can easily last from 50 to 100 yards, while a brick wall will last for more than 100 years. But it all depends on how much effort you have put in and the quality of the construction.
Conclusion
There you have it. Making your do it yourself retaining wall might require some proper skills to get the job done. But you will end up protecting and beautifying your property up to an epic proportion.
If you have done your work properly, your do it yourself retaining wall can last for decades. And you get to brag about your construction projects for years to come.
Just make sure you use suitable materials according to the area. Ensure proper drainage, and don’t go for long walls. Instead, go for a tiered one, and it will significantly enhance the looks of your property.
