While many gift ideas can send a strong message to your loved ones, nothing is more heartfelt, functional, and charming than a DIY photo coaster. You can add a meaningful photograph to the coaster to make it a special present. The best part about DIY coasters is that they can be given to almost anyone, whether they’re your friends or family. You can even make one for yourself, something to add to your home décor. Plus, it keeps the condensation beads away from your table!
This article will teach you how to make a DIY photo coaster out of epoxy resin. Let’s see how they’re made.
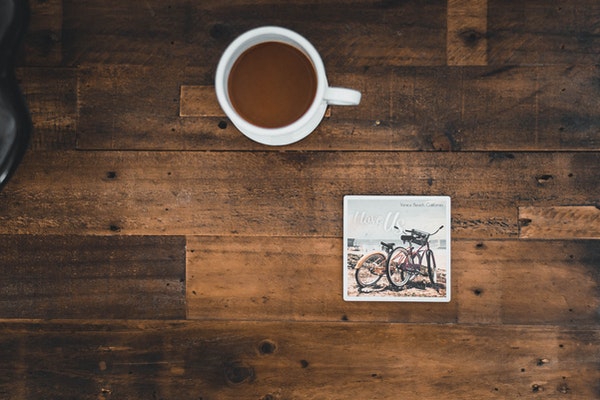
DIY Resin Photo Coaster
One of the main reasons resin is the top choice for making photo coasters is that it is budget-friendly. You can use other options, but you can easily create a set of photo coasters for less than $10 by using epoxy resin. Plus, resin gives an excellent glossy finish and lasts long.
To make the present even more meaningful, you can use handmade drawings, newspaper clippings, tickets to a memorable event, etc., instead of photographs. It is an excellent way of preserving precious photographs and mementos for life. Once the epoxy is set, it doesn’t come off, making it one of the most durable materials of all time.
Things You’ll Need
Here is a list of all the things you’ll need for this DIY project:
- Epoxy Resin: You can easily find epoxy resin in any craft store. They’re available in the glue section. You can get a small bottle since this is such a small project. A tiny amount goes a long way. Try to get two-part epoxy resin.
- White Tiles: White tiles are commonly available at home improvement stores. A 4-inch tile is a perfect size. You can always choose a bigger size if you want a bigger coaster. You’ll need one tile for each coaster, so get as many tiles as the number of coasters you want to make.
- Photograph: Get your photographs printed into a 4-inch square to match the size of your tile. If they’re only slightly bigger than the required size, you can always trim them.
- Scissors
- White craft paint
- Glue stick: Any regular glue stick lying around at home would do
- Paintbrush or foam brush: You can use either one at home. In case you don’t, they’re available at any hardware or craft store
- Craft felt: One sheet of craft felt is more than enough for one coaster. In fact, a single sheet sized 9 x 12 can be used on a set of six coasters. Choosing a black sheet is better because it doesn’t make stains and marks as evident as other colors.
- Disposable spoon and cup: If you have disposable cups and spoons lying at home, this is the perfect opportunity to use them.
- Ventilated space: Since you’ll be working with epoxy resin, you will need to work in an open space or a ventilated area as it is toxic. Ensure that your pets and children don’t come near this area when you’re working.
- Reusable Plastic
- Hot glue/ glue gun
Steps
After going over the long list of supplies, making a DIY photo coaster can seem like an intimidating task. But it’s not as difficult as it seems. On the contrary, it is a straightforward process. Here are all the steps you need to follow for successfully making DIY coasters:
Step 1: Prep the Workstation
When you work with epoxy resin, things are bound to get messy. Before starting the project, make sure you lay old reusable plastic bags on your workstation.
Step 2: Paint the Tiles
Paint the edges of the tiles using white craft paint. You can use any paint or foam brush for applying the paint. You can also skip this step if you want, but painting the edges gives a better finish to the final product.
Step 3: Trim Photographs
If you already have a 4 x 4 inches photograph, you will still need to trim them down a bit. Since the tile is also 4 inches, the photographs should be approximately ¼ inches smaller. This ensures that the resin completely seals the photograph.
Step 4: Stick the Photos
Use a glue stick and stick the photos to the center of the tile. After applying glue to the back of the photographs, press them against the center of the tile and remove air bubbles. Wait for the glue to dry.
Step 5: Mix the Resin
Using two-part resin means mixing both parts in equal proportion. You’ll need to mix two teaspoons of each part for one coaster. Use a disposable plastic cup and spoon for this step. After adding both, start mixing them for at least two minutes. Take small pauses in between to scrape down the edges. Once small bubbles start appearing, your epoxy resin will be ready to use.
Step 6: Apply the Resin
Apply the resin onto the surface of the photo using the spoon after the glue is completely dry and your resin is mixed thoroughly. Start with the center of the piece. Apply two layers to the center, and using the same spoon, spread the epoxy resin outward. Make sure the resin coat on the DIY coasters is even and stops just before reaching the edge of the tiles.
Step 7: Remove Air Bubbles
If there are any air bubbles left on your coaster, remove them immediately. Exhale hot breath over the bubbles. The carbon dioxide you release will remove the air bubbles. But make sure you turn away before inhaling again, as epoxy is toxic.
Step 8: Let Dry
Once all the air bubbles are removed, wait for the resin photo coaster to dry. It generally takes around 24 to 48 hours for the epoxy to cure completely. Once the resin is dry, you can move on to the next step.
Step 9: Glue the Felt to Tiles
Now take the black felt sheet and cut it to match the size of your tile (4 x 4). Glue them to the bottom of the tiles. You can even apply it to the edges of the tile, but this is entirely up to you. Use hot glue for this step instead of a regular glue stick.
And with that, your DIY photo coasters are ready to use.
Conclusion
Making a DIY photo coaster is easy if you have all the supplies. If you’re making the resin photo coaster for your home, they will be ready to use after applying the felt sheet. If they’re a present for someone, you can place them in a cute package and add a small note, and you will be good to go.
