Have you ever longed for a do it yourself fire pit in your backyard? It’s not that difficult to make one, and you won’t have to deal with any unwanted cooking. You can use it in winters to warm up and cook on it in the summers for some wholesome backyard fun. These do it yourself fire pits are great for get-togethers as well.
The best part is, you don’t have to go through much in a do it yourself fire pit project. You need to have some know-how with construction and building materials. There are different tutorials available on the internet to go through such a project if you haven’t done it before.
However, you will need to use your muscle power for the digging process, but your cardio will worth it in the end. We bet you won’t have to leave your home when you can have a campfire right in your backyard.
How to Build a Fire Pit?
Step 1 – Outlining your pit
You need to lay out a bottom ring of your landscaping stones on the grass in the areas you want to make your fire pit yourself. If you are going for the metal ring, you can use that to fit the same purpose. Just place it on the ground on the pit’s location and put a few stones around it to make the circle.
You can remove a few stones to make some space between them and mark the space where it is empty. Complete the traced circles by removing the remaining stones.
Step 2 – Digging your pit
Take your shovel or any other digging tool and start the digging process where the markings are. The area where you live will tell a lot about how much effort you need to put in. Some areas have a lot of larger rock in the ground, while others have grass with solid roots.
Step 3 – Filing your pit
It’s time to fill up your pit after you have dug a 6-inch hole. Use gravel and put it into your hole until it levels with the ground. The gravel will give your pit a critical area for drainage if its rains. So, you need to have this much room in your hole.
Step 4 – Building your pit
You need to place that first ring in your landscaping stones right around the circle’s edge is filled with gravel. Use your rubber mallet for tamping these stones flat with one another. With the help of a metal ring, you can keep this gravel right in the center to ensure they continue to fit your landscaping stones.
When you are about to put your second line of stones, don’t forget to use some adhesive right on each stone’s bottom to ensure they remain intact.
Ensure that the middle of each of the stones sits right on the end of your second row of stones. Again, use the rubber mallet to tighten and even your stone placement. Now you need to complete the third row of landscaping stones.
Step 5 – Lighting the fire
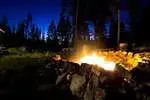
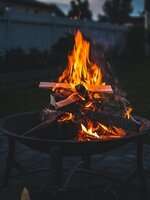
After building your pit, it’s time to light up the fire. And for that, you will need to begin by using a small collection of newspaper sticks, dry leaves and pile them up right in the center of your fire pit. After lighting up the starter pile, it’s time to start adding some bigger branches and smaller logs. Later on, keep adding more significant pieces of wood.
With several fires, you will have to scoop out the ashes from previous fires, and for that, you can use a shop vac to prevent them from building up, or they will start flying around like crazy.
10 Unique Do It Yourself Fire Pit Ideas
Have you ever brainstormed about some unique ideas for your fire pits? Here are some cool do it yourself fire pit ideas that you can use to get started with your pit in the yard.
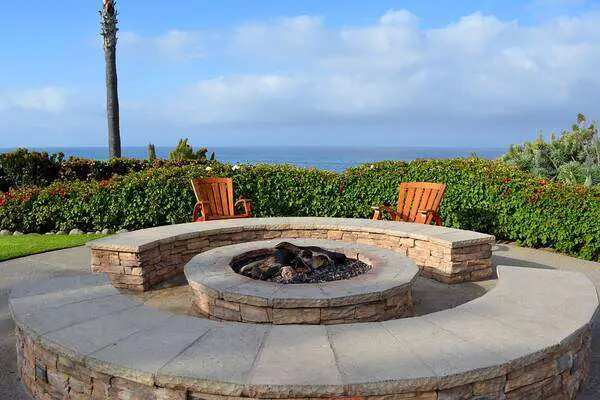
1. Half wall stone fire pit
These pits look very clean, and they look great with any decor too. These pits are easy to make and great for using your backyard space as much as you want. You will need some stone bricks as well as some cement and glue. Just outline the areas with the spray and start working along with the markings.
2. Round stone fire pit

For a circle-shaped pit, you can always use a similar technique for the halfway pit. The important thing here is to properly outline the area in a circle and work along the way. Just keep in mind to place all your bricks correctly to keep them from falling apart. It’s a compact pit and looks nice. Just use the spray paint for the finish.
3. Tree ring fire pit
These concrete tree rings make a brilliant-looking pit, and you can stack two or more rings right on top of one another. Making smaller circles and stones right between the two rings give it a more aesthetic look. And don’t forget to give a nice finish in the end. It looks stylish and works with any decor too.
4. Washing machine drum fire pit
It’s a great way of using an old washing machine’s drum and converting it into a nifty little pit for your backyard. A few tweaks are required before you can use it. But you can do it in no time, and the best part is, you don’t have to do much construction here. So, if you think you are no good with bricks and cement, this project will work for you.
5. Simple stone fire pit
This project is all about keeping things simple. Just make a triple-tier pit at a very affordable cost if you understand how you need to do it. Just make a circle with those concrete blocks and fully cover the inner base. Now start stacking the tires and make sure that you secure them all, so they don’t end up falling apart. There you go, your pit is ready to light up.
6. Square concrete fire pit
This base-level fire pit will look classy, and it’s straightforward to make as well. The best thing about them is they look very professional when you are done with it. But you can easily pull it off even if you don’t have much experience. Just set your base to do it yourself fire pit a bit deeper right into the ground. This way, you will have sufficient enough surface work that can handle the depth.
7. Stylish brick fire pit with benches
These pits don’t need to be unappealing or dull. If you can pull it off correctly, you can add a lot more detail to this spot in your backyard. With only a few concrete bricks and a bit of creative thinking, you can build a fire pit. Just place the blocks on one another where the middle ones are standing perpendicular to the line above and the beneath. This style looks professional and is very easy to pull off.
8. Stone and concrete fire pit
Here’s another square fire pit that you can make just like a circular pit. All you need to do is place the concrete blocks right around the area you want your pit to be. Just glue them together using a concrete mix. Outline the area from where you want to build your pit. You will only need 2 to 3 blocks for this project.
9. Circle fire pit with back
If you want to get creative, you can always build a pit with a back too. Your pit will be the center of attraction for sure. You will have to be a lot more cautious with the placement of the blocks, especially for the back. Therefore, you will have to double-check all the measurements to make sure you get the best results. Just build a structure or a wall, and it will serve as the back of your pit. You can create any shape for it; maybe a teardrop shape will work for you!
10. Stacked stone fire pit
If your ground is sandy or muddy and you are looking to convert it into a fire pit, dig a hole and place some stones around it. For more height, stack the stones right on top of one another. You won’t need to use concrete, but for longevity, you can do that too.
How to Use a Fire Pit?
New to using fire pits? There are three different ways of using a fire pit, and they are briefly explained as follows.
Using an in-ground fire pit
First, you need to check whether you can use an inground fire pit or not in your area. You must have a good look around before you position our area for the pit. You also need to consider how you want your guests to interact with each other and position the seats accordingly.
It’s time to gather all the fire materials and not forget to use dry wood only. Place it all in your pit and light the fire up. Keep maintaining the fire by adding more wood. And when you are done, throw a bucket of water and put the fire out.
Using a fire bowl
Again, check your municipality whether you can use a fire bowl or a portable fire pit in your area. You need to place your bowl in a safe place where there is nothing nearby surrounding it.
It’s time to gather the materials to fire up, and when you are done out them all in your fire pit. It’s time to light the fire up and make sure you maintain the fire by adding more wood into it. And when you are done, throw in a bucket of water and put the fire out.
Chiminea fire pit

Begin by checking out whether your local municipality allows chiminea fire pits in your arm or not. The process is similar to the one that features a fire bowl. You will have to place your chiminea in a very safe place where you don’t need to move it again and again. It’s time for you to gather all the materials for lighting up the fire.
Then, place all these materials into your fire pit and light the fire. Maintain the fire by adding more wood from time to time. And when you are done, allow the fire to go out on its own. Don’t use water here and if your chiminea pit comes with a lid, then cover it to restrict the flow of air.
Things to be careful about
Did you know you need to check your local codes for building a fire pit in your yard? Before you begin your fire pit, you have to check on those recreational fire codes in your region to see if you are allowed to work on such a project or not. You can get in touch with your local fire department for this.
In general, you need to be at least 10 feet away from any buildings or structures, and there shouldn’t be any other obstructions like fences, trees, or anything else. Also, make sure you don’t need anything to be hanging right over your pit. Even if the tree has its base over 10 feet away, its branches shouldn’t be right there over the pit.
FAQ
What can I use instead of a fire pit?
You can use various other items like a washing machine drum, tire rims, a cast iron pot, barrel, keg, wheelbarrow, steel wok, and similar other items for this purpose.
Can you burn paper in a fire pit?
No, don’t use paper in your pit and only use wood for this purpose. Burning trash, paper, or anything that’s man-made releases greenhouse gases and carbon dioxide as well as other toxins and are harmful to the environment.
Should I put rocks in the bottom of my fire pit?
River rocks, sandstone, gravel, antiviral rocks are not ideal options. Just make sure the rocks you are using are dry, or they will explode under high heat easily due to moisture content in them turning into gas.
Conclusion:
For making the best do it yourself fire pit, you don’t even need any masonry experience at all. Just make sure you find the right place and mark the area for digging. Also, don’t forget the municipality rules and check what kind of pit you can make. It will enable you to build your pit just the way you want.
You can either use concrete, stones, blocks and either go for glue, concrete mix or position them to fall apart. It can be as straightforward or as complicated as you need it.
