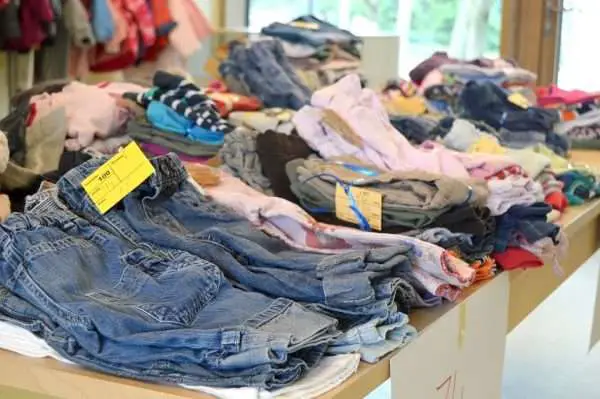
Do you find it difficult to discard those old t-shirts you haven’t worn in ages? Or you don’t know what to do with that cool jumper you love but doesn’t fit anymore. Upcycling clothes is a great way to create something fun and exciting from those clothes that you don’t use anymore.
When it comes to upcycling clothes, you have so many options; creating grocery bags, rugs, headbands, and whatnot. So, utilize your old clothes with some of the amazing DIY ideas we are going to discuss in this article.
Tote Bags from Old Tank Tops
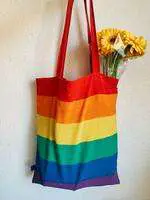
We all have so many tank tops in our closets that we last wore some four or five years ago. Right? So why not create simple yet handy tote bags out of them using this easy upcycling clothes tutorial?
What you’ll need:
- Tank top
- Sewing machine
- Scissor
- Straight pins
- Tailor chalk
- Start with removing the tag from the tank top using a scissor and turn it inside out.
- Fold the straps so that they lie on each other.
- Fold the tank top from the bottom till about half an inch from the neckline and secure it in place using straight pins.
- Take a tailor’s chalk and draw 2-3 straight lines, depending on the number of pockets you want.
- Sew the seams along the lines you drew to create the pockets.
- Now, draw a line along the bottom about a half-inch from the edge.
- Sew the front and back of the bottom together along the line and turn the bag right side out. This way, the pockets will be inside.
No-Sew tote bag
If you’re not into sewing, here’s how you can make tote bags without needing any sewing machine, needles, and threads:
- Start with turning your tank top inside out and lay it on a plain surface such as a table.
- Draw a line 2-3 inches from the bottom using a tailor’s chalk or fabric marker.
- Take a scissor and cut the tank top vertically from the bottom till you reach the 2-3 inch line. Repeat this step to make cuts every 0.5-1 inch along the bottom to create stripes.
- It’s important to cut from both front and back. This way, you’ll have pairs of stripes along the bottom that you’ll tie together to close the bottom end.
- Once you’ve tied all the stripes, turn your bag right side out. You can now use your tote bag for groceries or anything you like.
- If you intend to carry items in the bag that you think can fall from the holes between the knots, you can do another series of knot tying. For this purpose, tie together a top and a bottom strip from two adjacent knots. Repeat this step along the bottom to cover all the holes.
- Now, you can carry any item in your cute tote bag!
An even quicker way to make a tote bag in less than 5 minutes:
Turn your tank top inside out and tie the bottom with a rubber band or any other durable hair tie. Now turn it right side out, and voila, you have your simple tote bag!
Tie Dye Old T-Shirts

Want to create funky shirts from old white t-shirts? Follow the simple steps below:
What you’ll need:
- White t-shirt (preferably cotton, linen, rayon, or silk)
- Dye
- Dye/squeeze bottles
- Gloves
- Rubber bands
- Ziplock bag
- Soda ash
- The first step is to soak the t-shirt as it will allow the dye to bond with the shirt properly. For this purpose, take warm water and add soda ash to it. Make sure to read the instructions on the soda ash packet to mix the right proportion of soda ash in water. Also, add about two teaspoons of salt to the solution and mix well.
- Now, soak the t-shirt in the mixture. Take it out after 10-12 minutes and squeeze thoroughly. You can also spin the shirt in a washing machine. Remember to wear gloves as soda ash can cause irritation.
- Place the t-shirt on a plain surface such as a table or floor. Take a dowel rod/wooden rod and place it in the middle of the shirt. Turn the rod clockwise or anticlockwise. This will create a pie-like pattern.
- Now remove the rod carefully and put rubber bands on the shirt to secure the pie shape/pattern.
- Put the dyes in squeeze bottles. Before you dye the shirt, it’s better to cover the working area with a plastic sheet. Also, remember to wear gloves to prevent the dye from reaching your hands.
- Now, pour your favorite colors/dyes on the shirt (both front and back).
- Put the shirt in a ziplock bag and seal it properly. Put it in a warm area and leave it there for about 24-36 hours.
- Unwrap the shirt, and you’ll have a totally new, funky tie-dye t-shirt.
Reverse Tie dye t-shirt
If you don’t have old white t-shirts, Don’t worry! You can use your solid color t-shirts to create cool tie dye patterns using the reverse tie dye technique. This technique is definitely among the best DIY upcycling clothes ideas.
Before we start with the step-by-step instruction, let’s first give you an idea of what reverse tie dye is. Reverse tie dye involves removing color from the t-shirt to create beautiful patterns instead of dyeing it with new colors. This technique mainly requires bleach which works as the dye.
Now let’s show you how you can reverse tie dye your old t-shirts.
What you’ll need:
- Solid color t-shirt (preferably cotton, rayon or linen, etc.)
- Bleach
- Rubber bands
- Container
- Gloves
- First, take a container or a tub, fill it with tap water and soak your t-shirt in it. Because this method involves working with bleach, it’s important to choose a properly ventilated area.
- Squeeze the shirt thoroughly to get rid of excess water.
- Fold the shirt in any shape of your choice, such as round or square, to create patterns. You can also use cardboard pieces to create different patterns.
- Put rubber bands on the shirt to ensure it remains in the shape you’ve folded it in.
- Now, fill the container with bleach and fully soak the t-shirt in it. Remember to put on gloves before you start working with bleach.
- Take out the shirt from the bleach after about 15-20 minutes. At this point, you’ll see the shirt has changed its color.
- Rinse the shirt thoroughly to remove the bleach.
- Wash the t-shirt in the washing machine and let it dry. You’ll have a cool tie dye shirt with a beautiful pattern, depending on the shape you folded it in.
Baby Bibs from Old Shirts

If you have a toddler, no matter how many bibs you have, you always want more. Right? So, make as many cute baby bibs from old shirts as you want with this easy DIY upcycling clothes tutorial:
What you’ll need:
- Old t-shirt
- Fabric for back such as fleece
- Straight pins
- Scissor
- Baby bib (to use as a template)
- Sewing machine
- Sew-on snap or velcro
- Thread and needle
- Put your t-shirt on a plain surface such as a table.
- Place any baby bib on the shirt and secure it with straight pins.
- Cut the shirt around the bib to create the front of your new bib.
- Next, you have to cut the back of the bib. You can now use the front as a template for the back.
- Put the fabric you want to use for the back of the bib on the table. Place the front of the bib on the fabric and secure it using straight pins.
- Cut the fabric around the bib.
- Now, sew the front and back using a sewing machine.
- Finally, attach the sew-on snaps on the straps using a needle. If you’re using velcro, you can sew it using a sewing machine.
Pouch from Old Neckties

It’s difficult for most people to discard old ties because they usually have sentimental value. Sometimes it’s close to your heart because it belongs to someone close who passed away. Or maybe it’s a gift from someone special. So, turn your neckties into a handy zip pouch.
What you’ll need:
- Two old neckties
- Metal zipper
- Fusible interfacing and fusible fleece
- Lining fabric
- Straight pins
- Start with removing the stitches from the back of the necktie and take out the interfacing. Press the tie and repeat these steps for the second tie as well.
- Next, cut a 6×9 inches piece from each tie. If your ties don’t have enough fabric, you can change the size accordingly.
- Cut two 6×9 inches pieces from fusible interfacing. Do the same for fusible fleece and lining fabric.
- Fuse the interfacing on the back of both the pieces you had cut from the ties using the iron. Also, fuse the fleece on the back of both lining pieces.
- Next, you have to make zipper tabs. For this purpose, cut two small pieces of fabric from one of the ties, fold them, and press.
- Attach each folded piece to each end of the zipper using straight pins. Stitch the pieces to the zipper and cut the extra fabric.
- Now place the piece of the tie on the table that you want to be on the front. Attach the zipper to it using straight pins. Place the lining fabric on it so that the wrong side of the zipper is towards the right side of the lining fabric.
- Seam the zipper using a zipper foot and repeat these steps for the second piece of the tie. You can also topstitch along each side of the zipper to make it more long-lasting
- Now stitch the front and back pieces around the pouch. Remember to leave 3-4 inches opening in the lining so that you can turn the pouch right side out.
- Once you’ve turned the pouch right side out, sew the opening using the slip stitch and press the pouch.
Unique bracelets and Lampshade covers from Old Sweaters
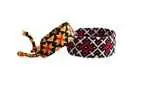
With this quick DIY upcycling clothes idea, you can create unique bracelets in just 5-10 minutes.
What you’ll need:
- Old sweater
- Scissor
- Bracelet form
- Needle and thread
- Place your old sweater on a table and cut out a rectangle using a ruler and scissor. Remember to keep the length of the rectangle that fits on the bracelet form. The same goes for the width.
- Now, sew all the sides about ¼ inch from the edges.
- Next, sew both the end of the rectangle together.
- Slip the piece of the sweater you sewed over the bracelet form.
- Now, sew the edges of the sweater together using thread/yarn and needle. You can also use glue instead of sewing the sweater. This step is important as it will give a more appealing look to the bracelet.
- Repeat the above steps using different sweaters to create more unique DIY bracelets.
Lampshade Cover
This is another quick and super easy upcycling clothes idea to utilize your old sweater.
What you’ll need:
- Old sweater
- Lampshade
- Glue gun
- Scissor
- Slip the sweater over the lampshade and cut the sleeves and the neck hole.
- Trim the extra fabric but leave around 1-inch so that you can fold it inside the lamp.
- Using a glue gun, glue down the fabric from the top and bottom inside the lampshade. And your new lampshade is ready!
DIY Braided Headband from Old T-Shirt
This is another easy upcycling clothes idea that you can use to create stylish headbands.
What you’ll need:
- Old t-shirt
- Scissor
- Sewing machine
- Needle and thread
- Place your t-shirt on a table and cut five strips around 1.5-2 inches wide. Remember to keep the length of each strip no less than 28 inches.
- Now put the strips on top of each other and sew them together, around 1 inch from the edge, using a sewing machine.
- Next, you have to braid the strips. For this purpose, assign numbers 1-5 to the strips from left to right.
- Take strip 1 over strip 2 and strip 3 over strip 1.
- Next, take strip 5 over strip 4 and strip 1 over strip 5. Now, move strip 5 to strip 2 and 3.
- Repeat the above steps to create a braid.
- Once you reach your desired length, sew the other end.
- Now, sew both ends together.
- To make your headband look more attractive, you can cover the seam from the same fabric. For this purpose, cut out a small piece from the same t-shirt and cover the seam. Now, sew it using a needle.
If you’re confused about how to make a braid from five strands/strips, you can watch the video below:
Summer Dress from Men’s Dress Shirt and an Old Tank Top
What you’ll need:
- Old tank top
- Oversized men’s dress shirt
- Sewing machine
- Straight pins
- Scissor
- Take an old tank top and cut it horizontally, just below the armhole. You’ll be using the upper part for your summer dress. Remember to leave some space for seam allowances.
- Next, place the men’s t-shirt on a table and cut it just below the collar. Also, cut the sleeves.
- Now cut the sides of the shirt (about 1-inch from the edges) vertically from the bottom to give it a nice shape.
- Sew the sides of the shirt.
- Now attach the top piece you had cut from the tank top to the shirt using straight pins.
- Next, turn the shirt inside out and sew both the parts together.
- Finally, turn the shirt right side out, and you’ll have your new, classy summer dress.
Braided Rug from Old T-Shirts
What you’ll need:
- 10-12 old t-shirts, depending on the size of the rug.
- Sewing machine
- Scissor
- Thread
- Start with cutting about 2 inches wide strips from your t-shirts. Remember to cut from both front and back.
- Sew the ends of the strips to create three separate, very long strips of equal length.
- Next, tie the ends of the three strips together.
- Now create a simple three-strand braid from the strips.
- Once you’ve completed the braid, fold it in half and sew the two half together till your desired rug length.
- Next, wrap one side of the braid around the braid you’ve stitched in the above step, pull it up the other side and sew.
- Repeat the above step till you’ve stitched the whole braid.
Frame Your Favorite T-Shirts
Looking for an easy upcycling clothes idea to utilize your favorite band or football t-shirt? Follow this simple tutorial.
What you’ll need:
- Old t-shirt with printed front
- Frame
- Glue/tape
- Take your t-shirt with the print of your favorite band, soccer teams, etc., and cut it into a square. The size of the square should be according to the size of the frame you want to put it in.
- Attach the square piece of the t-shirt to the frame using glue or tape. And you’re done! Now, you have a unique artwork from your favorite t-shirt. Hang it on a wall or place it on a table.
T-Shirt Produce Bag
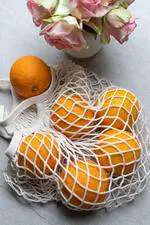
Produce bags are handy and stylish. Moreover, they are a better option than disposable plastic bags to carry fruits and vegetables as these bags are also reusable.
So, create stylish produce bags at home with this quick DIY upcycling clothes produce bag tutorial:
What you’ll need:
- Old t-shirt
- Scissor
- Sewing machine
- Tailor chalk
- Begin with turning your t-shirt inside out. Place it on a table and fold it in half vertically.
- Draw an arch shape just below the armhole using the tailor’s chalk and cut it. Also, cut the bottom hem.
- Sew the bag along the bottom and sides and turn it right side out.
- To cut slits, start with marking lines on the bag using the tailor’s chalk.
- Now cut the slits with the tip of a scissor. Remember to do this for both the front and the back.
- Finally, cut the slits for handles.
FAQs
What can I do with the clothes that I don’t upcycle?
If after upcycling you still have clothes that you don’t use anymore, you can ask your friends if they want any of them. You can also sell your used/old clothes on eBay or Facebook Marketplace. Another option is to donate them.
Can I make money from upcycling clothes?
Yes, you can definitely make money by creating unique and beautiful items from your old clothes. For example, you can sell tote bags, produce bags, bracelets or headbands, etc.
Final Thoughts
We all have so many clothes that we just don’t discard even though we haven’t used them in ages. So, instead of keeping them in closets, why not upcycle them and make them useful again? Upcycling clothes is not only fun, but it is also an excellent way to create something unique from your old clothes.
From tote bags, bracelets, and headbands to rugs, pouches, and artworks, there are so many useful and creative items you can make from your old clothes. So, make your favorite items with the amazing DIY upcycling clothes ideas we’ve shared in this article.
Want to learn more about upcycling and different items that you can upcycle? Check out our article on “DIY Upcycling-The Ultimate Guide.”
