DIY knitted accessories are lovely! Are you envious when you meet someone who knows how to knit? Don’t be; there are plenty of projects you can start for a hobby or even for making money. If you are a mom or unemployed and want to make some extra money, DIY knitted accessories are the best idea.
What is remarkable is that you don’t need to follow any trade shows craft fairs in your city; you can make and sell everything out of your imagination in the comfort of your home.
Nowadays, everything works online. With Facebook groups, websites like Etsy and eBay, or a blog, you can create an online shop and sell all your crafts. What is easier and more profitable than having access to people around the world?
If you are new to knitting and don’t want to consume all your time, you can start with easy techniques. Don’t think that all the knitting projects are complex and confusing. There are simple patterns for creating perfect gifts, creative home decor, accessories, or even a business.
Read below a list of modern DIY knitted accessories!
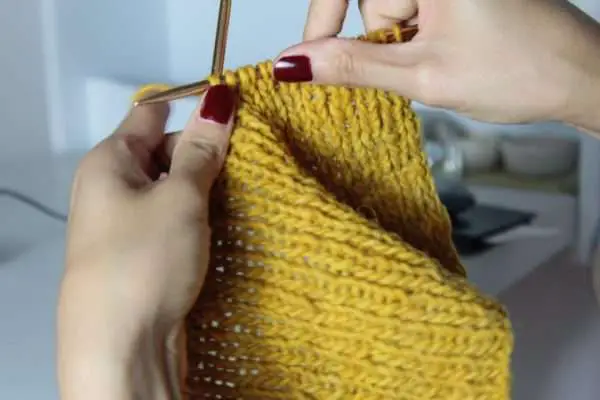
Knitting Loom Cowl

An excellent DIY knitted accessory is a knitting loom cowl. This project is considered a kids project. If you search for something lovely and easy to make, knitting loom cowl is the best project to create. It is warm and beautiful.
Supplies needed:
- knitting loom kit
- one skein of yarn
- a ring (use the biggest ring in the set to fit easily on your head)
Every kit comes with instructions so that you can complete your loom project efficiently and quickly.
Steps to make a DIY knitting loom cowl
Step 1
Start with the peg on the side. Loop the yarn around each peg by making your way around the peg. (Leave your loops a bit loose). I find it easier to work clockwise, but you can work in either direction you prefer.
Step 2
Once you complete one ring, wrap a second row.
Step 3
Now start weaving. Start from the outside of the ring, take the bottom loop, and pass it over the top loop. It is best to use the weaver that is included in your kit; it is the most suitable tool for the project.
Step 4
Loop your yarn around the pegs. Each time that you complete a row, repeat the process.
Step 5
You need to complete at least 30 rows in order to create a
beautiful knitting loom cowl.
Step 6
To finish your craft, unwind the length of yarn with a couple of inches to spare.
Step 7
Cut it off, and put it onto the needle. Start from the peg that marks your row and pass the needle through the loop remaining on the peg. Slip that loop off the peg.
Step 8
Make the final loop tighter.
Step 9
Tie a knot to shield the end and trim the edges.
Step 10
Do the same with the first row.
Let’s point out that it usually takes up to 2 hours to create a fabulous knitting loom cowl. Even a beginner can make this DIY knitted accessory in one afternoon. Cowls look great under the jacket on the cold winter days. Suit it with a nice sweater and create an elegant winter look.
DIY Knitted Stool
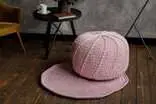
Who wouldn’t love a knitted stool to add to the living room? It is a project that catches the eye. There is nothing better than the thought of hot chocolates, a fireplace, and an easy knitting project to keep you warm and busy. If you want to earn extra money from your knitting project, the stool is the best option.
It may seem hard enough to make it, but it’s not. The DIY knitted stool is a beginner’s project. If you create it once, it will turn into your obsession.
Materials
- knitting needles
- 2 kingsize duvets
- 2 cushions
- a bodkin or a large darning needle
- alls DMC Hoooked Zpagetti
How to make a DIY knitted stool
Step 1
You need 60 stitches. Work in garter stitches and knit into every stitch to the end of each row.
Step 2
Continue until your work measures around 170cm or fit it around your rolled duvets. Oversew the cast-on and cast-off edges together in the shape of a tube by using the bodkin.
Step 3
Roll the duvets place your knitted tube inside. Insert the cushion vertically into the center.
Step 4
Thread your bodkin with yarn. Take the tube’s underside edge by inserting the bodkin under one of the ridges formed at the knitted cover’s row-end edge. Let the two ridges out and insert the bodkin under the next.
Step 5
Continue until you covered all the way around the opening.
Step 6
Pull the yarn’s edges tightly and knot them together.
Step 7
Place the edges inside the stool.
Step 8
Repeat the process on the top-side of your stool.
The amazingly cozy-looking DIY knitted stool will give a playful essence to your living room. Don’t forget that knitted stools are in high demand, and you can sell them for more than $100.
DIY Knitted Scarf

One of the most useful DIY knitted accessories are the scarfs. Everyone who knows how to knit has already created a scarf. The funny story is that the scarf is one of the easiest knitted crafts to complete.
You need only:
- yarn
- needle
- scissors
Steps to make your beautiful scarf
- Cast on 10-40 stitches using your first color of yarn. If you are a beginner, it is better to go for a smaller scarf.
- Knit for 12 rows with your first color. Remember, it is not necessary to use different colors; the choice is yours.
- Cut the yarn with your scissors when you complete the 12th row, but make sure you leave a tail at the end.
- Add the second color of your yarn (optional). Align the first color’s tail with the beginning of the second color, and start knitting with the second color yarn.
- Knit about 5 stitches, and then stop and pull the ends. The ends should be loose.
- Again, knit 12 rows of your second yarn.
- Cast off the stitches. With a crochet hook, weave your loose string into your scarf.
You are ready to wrap the scarf around your neck and admire your new DIY knitted accessory.
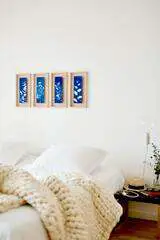
DIY Knitted blanket
Knitting a blanket may seem challenging for a beginner. However, with a bit of planning and some tips, you will be able to create a beautiful and cozy result.
What you’ll need:
- Cast On and Off
- Knit Stitch
- Weaving In Ends
- Needles (the size depends on the diameter)
Basic pattern instructions
Step 1: Cast on
Now you decide how many stitches you cast on. Cast on the stitches, but let them loose.
Step 2: Knit the outline
Knit the foundation rows of your blanket. The first rows will create the outline of the blanket. You will also knit a border on the beginning and end of the row as you continue onto the body.
Step 3: Knit the main body
It takes most of the time to be completed. Follow the pattern that you like in order to create the desired design. After a few repetitions, you’ll be able to remember even the most challenging patterns.
Step 4: Cast Off
Now you are ready to cast off. Remember to choose a stretchy cast-off so the final edge isn’t tighter than the others.
Step 5: Finale
Tie all the ends, and seam the pieces together. Knot the edges in order to secure the yarn. Weave the ends into the blanket stitches and then cut them short.
You would be surprised how quick and easy this DIY is. Try to choose a super-soft yarn to create a homey feeling.
And of course, who doesn’t love the cozy and warm night next to the fireplace? That’s why a giant blanket is the best DIY knitted accessory to sell. You can sell it for $500, without exaggeration.
Everyone can knit; you don’t need to give a significant amount of money to buy knitted accessories. Knit it yourself, and create your own online shop with DIY knitted accessories. Be smart and creative, and you will earn a lot of money from knitted projects. All you need is to learn the patterns and start your business.
If you enjoyed reading this article, you could always read ”DIY handbags ideas to make and sell” and learn a new skill that can be proven profitable.
