
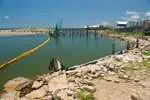
Living near a body of water? Then you will be dealing with the common water problems that are associated with this type of location. You need to stop those water currents at the shoreline and wear them away. You also want to maintain the aesthetics of your location while doing this.
This is where rip rap comes into play. While you can go for professional assistance, it would be better to opt for do it yourself rip rap. It is also called a rip rap seawall or a rip rap retaining wall.
These inclined retaining sea walls can protect your property from different harmful elements. These rip raps are different from other types of seawalls and have loose rocks. But they are great at guarding your property and add an aesthetic touch.
Let’s find out how you can build a do it yourself rip rap shoreline wall.
What is the Ideal Size of a Rip Rap?

The ideal size of a do it yourself rip rap depends upon the property. If you are dealing with larger water bodies, you can go with bigger rip raps. Smaller rip raps can work well if the water body is not that big.
A ton of rip rap with rocks that range from three to eight inches will comfortably cover around 35 linear feet along with 3 feet width. So, it will cover about 12 square yards. The ideal size for your property depends on how much of this rip rap wall you will need.
How to Build a Do It Yourself Rip Rap – Step by Step
So, how to build a do it yourself rip rap? There are not many complications with the building and installation of a do it yourself rip rap wall. It would be better to seek some professional assistance for better guidance.
You should only go for a do it yourself rip rap if you have plenty of experience in construction heavy equipment projects. Here are all the essential steps you need to consider in this entire process.
Step 1 – Taking measurements
First of all, you need to take the proper measurements of the area you want your wall to install. These rip rap walls are extremely efficient against erosion. But you have to be careful and make sure it’s not too steep, or it won’t be stable enough. Therefore, take the measurements carefully to keep them steady.
Ensure that going for a slope of the shoreline is 3:1 in terms of horizontal and vertical alignments. Keep in mind that 2:1 will be too steep and unstable either. It means you might have to excavate your property to level it out if you are looking to put the rocks down.
Step 2 – Compacting soil
During this excavation section of the installation process, you will have to compact the soil. Make sure you have the soil as tightly packed as possible. You can use backhoes for this. If the solid remains too loose or it’s not that compact, you might risk rock slippage, especially around the water. If you have a sandy shore, you need to compact the solid properly without any machinery but stomp the soil down physically.
Step 3 – Attaching fabric
Before you place the rocks on your shorelines, you have to attach the fabric. Using a filter fabric will keep the solid safe from any water erosion right under the rocks. So, this fabric will serve as an additional layer of protection.
Ensure to choose a fabric that can securely attach to the rocks and doesn’t slip or move. A common technique in doing so is 6-inch steel staples and attach the material to the shoreline.
This fabric will protect the soil as it uses the weight of all the rocks to keep a tight hold on everything. If you don’t attach your fabric properly, you might have to deal with erosion and your wall fading away.
Step 4 – Putting down rocks
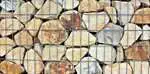
The next step is to put the rocks down on your sea retaining wall. But for that, you need to use the property sizes of rocks. Larger rocks are suitable for more significant properties, while sellers are suitable for smaller properties.
Smaller rocks range in size from 3-inch to 6-inch in diameter, and you can use them on small pounds or some larger lakes. These areas are most suitable for such types of rocks due to the motions of water.
However, you need to go for rocks ranging from 6-inch to 12-inch in size if your property is on an inland lake or a river shoreline. You can use granite or concrete blocks as your rip rap rocks. You can also go for paving and building demolition rubble as well.
How to Install a Rip Rap Stone Border?

Looking to install a rip rap stone border? This small step-by-step guide will work like a charm for you.
- You need to get in touch with your city authority or local county to check whether you need a permit or not. These shorelines fall under the protection and control of the EPA (Environmental Protection Agency). You will require to show a drawing highlighting the changes you will make, and their agent will visit your property.
- After getting the approval, you will need to excavate the area with the help of shovels and clear all vegetation to make the section smoother. Border width will depend on your needs and requirements and the solid type or the slope of your shoreline. Similar is the case with the gravel. Your county inspector or supplier can help you out in this regard.
- The next step is to place a filter fabric on the cleared area as it will help you keep vegetation from growing back. Make sure to hold it temporarily with stones to keep it in place. You will need to spread the cloth out evenly to the low tide area.
- You will have to dig a final trench right at the top of your riprap border in the final step. And then lay treated lumber right in the trench for demarcating the riprap section and divide it from your lawn area. This lumber will provide you with high efficiency in handling any termite infestation. You might want to paint or seal it, but that is not mandatory.
Benefits of Rip Rap Design
There are various benefits of using and choosing the best suited do it yourself rip rap design. Here are the most prominent benefits.
Eco-Friendliness
As your do it yourself rip rap is a natural element, it will create a new habitat for animals and vegetation. Vegetation and plants can go right between the rocks, and it will be better to add a more natural look to your rip rap wall.
When those waves hit a high point, they will cover your do it yourself rip rap in water. The rocks that you choose are usually tremendous, both aesthetically and environmentally.
Erosion Control
Your do it yourself rip rap is going to be highly efficient in handling erosion. This is one of the primary reasons why you are using this riprap design in the first place. Most types of seawalls are pretty effective against erosion. This is because the current if the water will slowly fend away from your property, keep it safe.
As the rocks are placed right along the shoreline, they will be the first in the line of defense against erosion. This erosion can occur from a variety of sources. These include high winds, watercraft wake, runoff, stormy weather, loss of trees and vegetation, sifting temperatures, and ice.
Property Enhancement
Another huge benefit of going for the do it yourself rip rap is that it will add value to your property. This riprap is going to blend very well with the environment as it will become part of it.
In terms of your property values, this rip rap is going to contribute significantly. Property evaluation takes place on appearance, and the natural look of your do it yourself rip rap will add to it.
This rip rap is going to be a natural barrier between water and your property. It will protect the shoreline, but it will also protect your property. Flooding and water leaks can take place when there is no protection, and they can get into your home in no time.
Easy Maintenance
As it’s a natural and organic barrier, its maintenance will not be that big of an issue. You won’t have to go through a lot to preserve your seawall. There is no steel to rust, no wood to rot, and no vinyl to warp here. You do it yourself rip rap is only going to need some maintenance in specific areas.
However, after a heavy storm or snow, you need to check your seawall and see for any damages that might have occurred. In most cases, you might have to replace the damaged rocks.
How Long Does Rip Rap Last?
So, how long is it going to hold itself? It’s a sturdy and reliable way to protect your property. Your do it yourself rip rap will last for a lifetime if you take care of it properly and keep it in good shape. It can easily last more than 40 years.
However, if your location experiences extreme conditions frequently, you will have to make more effort for maintenance. And, of course, it will add to the overall value of your property as well.
What Type of Rock are Used in Rip Rap?
You might be thinking about what type of rock you would need for your rip rap? The most popular rock for doing it yourself rip rap and any other kind of riprap is fieldstone. Fieldstone is also called river rock or glacier stone, and it’s the best type of stone that you can use for your do it yourself rip rap shoreline.
These stones are natural and eco-friendly, and they work well in keeping your property looking natural. These stones are not going to disintegrate that easily over time. It means your wall is going to last for a long time to come.
How Does Rip Rap Stop Erosion?
Ever wonder how rip rap stops erosion? Your do it yourself rip rap shoreline will increase the roughness and reduce the flow of water. It prompts quicker settling and improves water quality. Due to intense labor work, erosion control through this shoreline can be expensive, but it doesn’t need much maintenance.
It tightly holds the solid in place and prevents any water erosion because the solid is tightly packed as well, and the weight of the rocks are further pressing the soil down. There is a fabric filter present as well, and it plays a significant role in holding the solid together.
How Much Does It Cost to Install Do It Yourself Rip Rap?
This might be pretty costly. But the cost of this entire project will depend upon a particular project. But due to easier maintenance, you will be able to save a lot in the long run. The deterioration rate of the rocks is relatively slow because there is no rusting or rotting issue.
Excavation might also be required if you have to cover a lot of areas. But there is not much you have to do when it comes to maintenance, and simply having a check on your wall every year will work out well.
FAQ
What is R 3 rip rap?
This material for the rip rap is a boulder-sized rock that you usually see in lining streams and rivers. These rocks here range in size from 6-inch to 40-inch in diameter.
What size is Class 2 rip rap?
This rip rap is the largest and is most frequently used for erosion control and controlling the flow of water. These rocks weigh around 50 lbs to 500 lbs and range in size from 18 inches to 26 inches.
Can you use concrete for riprap?
Recycled concrete can break down into a range of different sizes. The larger pieces can be useful in making rip rap. So, you can use concrete for rip rap but in its RCA form.
Conclusion
So, what do you think about a do it yourself rip rap shoreline? It will cost you a bit initially, but there is not much maintenance cost involved. Hence, you can save a lot if you don’t go for professional assistance.
Just make sure you take the measurements properly and use the right kind of rock size. This will allow you to build a rip rap that will continue to serve you for a long time to come.