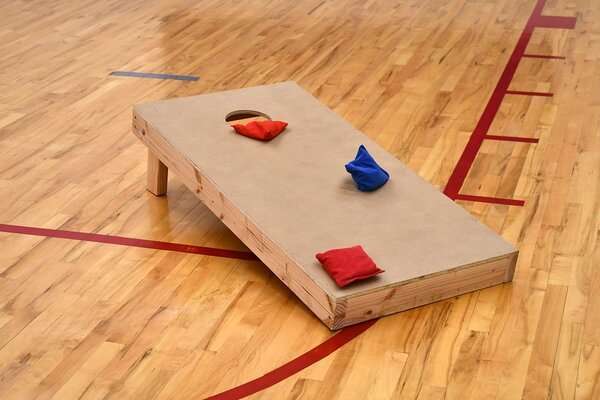
Need a reason to get out of your couch and play some outdoor games? A do it yourself cornhole board is going to work like a charm in such a scenario.
You might be asking can I make it on my own? Yes, of course, and the only thing you will need is a little bit of experience with the woodwork. The game itself is quite easy to learn and great fun addition to your backyard entertainment.
The best part is, you won’t have to spend a lot of money and time making it. So, keep reading to make a do it yourself cornhole board and have a great time during your get-togethers.
How to Make a do it yourself Cornhole Board – Step-by-Step

Thinking that it will take some time? But it’s not going to be that long. The overall time needed to make this do it yourself cornhole board is just a few hours. It might take you less than a couple of hours if you are a skilled woodworker.
But even if you don’t have that much experience, it will not be that difficult. First, just make sure that you take all the measurements precisely. Then, follow this step-by-step guide and make a do it yourself cornhole board.
Materials needed
- Two 2×4 feet plywood pieces
- Four 1×4 pine boards
- Four nuts and four bolts
- Twenty construction screws
Tools needed
- Clamps
- Circular saw
- Drill
- Compass
- Jigsaw
- Sander
- Paint roller
Step 1 – Cut the boards for the right size
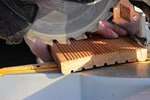
Start the cornhole project by cutting 1×4 boards into four 48-inch boards for the sides. You will also need to cut four boards for the back and front, and they should be 22.5-inch inside. Finally, there has to be a set of four boards for the legs, and they should be 15-inch in size.
You have to keep in mind that these dimensions are standard for a cornhole board. You might think that the 15-inch legs are too long, but you will make the cuts later.
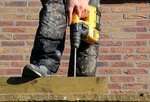
Step 2 – Construct the boxes
The next step is to fasten the 1x4s and make boxes by using screws and pilot holes. This process is pretty simple, and you are just looking to join the cut pieces of 1×4 boards into a box. You will get a frame where you will join the front and the backside in the following steps.
Step 3 – Hole the Plywood
Now it’s time to attend to the plywood and cut the holes into it. Take those 2×4 plywood pieces and mark a point on them from a side edge. This mark needs to be nine inches from the top and 12 inches from the side edge.
After that, you need to draw a circle right around this mark using your compass. This circle should be six inches in diameter. Now, you must drill a pilot hole right along the edge of this circle. Take your jigsaw and cut out the remainder of the hole.
Step 4 – Attach Plywood to the box
The next step is to attach the plywood to the box you made earlier with your 1×4 boards. Now you need to clamp the plywood with the box using the countersink bit and drill those pilot holes. After that, fasten the plywood with the box using the screws and bolts.
Step 5 – Cut leg arcs
Here you will cut the leg pieces as planned. You need to mark a point down the length of these 15-inch legs, and the mark has to be 1.75-inch down the length. Now, take your compass and draw and cut an arc using your jigsaw.
Step 6 – Fit these legs
The next step involves turning the box on its head. But lay one leg parallel right towards the side of this box. Keep the arc side right in the corner and clamp it in place. After that, drill in a 1.5-inch hole right through both these pieces, including the frame and the clamped leg.
When you are done, you will need to repeat the previous step, make the second leg, and clamp it. Later on, you will have to fasten the legs right to the board using bolts and nuts.
Step 7 – Cut an angle for these legs
Here, you need to lift the entire platform. And you can use a scraped piece of wood, a bucket, or anything else, really. Just make sure the top side of the plywood is raised at least up to 12 inches directly from the round underneath. Now position it right at the edge of the worktable.
Just fold out both legs and use the worktable for marking an angle right on the legs. After that, you will have to detach the legs and cut them right along the line with the help of a circular saw.
Step 8 – Sand and paint to finish
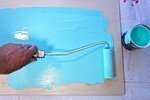
All your work is done here except that you will have to sand your boards. Prime your do it yourself cornhole board and paint it in whatever way you like. With the help of an amazing paint job, you can give your do it yourself cornhole board a costume look if you want. Just fold out the legs and palace your board at least 27 feet away from point to point. It’s time to enjoy the game and have fun with your company.
How to Make Do it yourself Cornhole Bags
Want to make your cornhole bags and don’t want to buy them? That’s great; there is a simple process to make these as well. However, you need your cornhole bags to be sturdy and strong, and therefore, you should go for duck cotton material.
This duck cotton cloth or linen canvas can withstand plenty of abuse associated with tossing around. You can either fill the base with resin or corn. Resin bags are all-weather, while corn bags are standard.
The fabric

As we have mentioned above, the duck cotton material is nothing else than linen canvas. Not all canvases are 100% cotton, and many canvas styles have synthetic fibers like nylon or polyester.
However, cotton duck only has natural cotton and nothing else. In addition, the tight-plain weave canvas is heavier than other canvas cloth styles, so it can withstand plenty of abuse over time.
Corn vs. resin
The corn used for the bags is usually the whole kernel, breaking down over time and becoming minimal dust. This dust will then coat the cornhole boards, and the sliding of the bags will become easier. But these corns are prone to bugs and corn weevils.
This is especially the case when it’s the rainy season. These bugs will hatch eggs that will turn into larvae with appropriate conditions and moisture when you store these bags. So ultimately, the bags will soon be filled with bugs and not with corn.
Therefore, some people prefer to use resin which is just plastic beads. These beads won’t break down and can last a lot longer than corn. And you certainly won’t have to deal with any weevils either. But without any corn dust due to breakdown, your bags won’t move that easily. Overall, it’s your preferences; which option do you consider for your play.
Material needed
- Poly pellets
- Canvas duck cloth
- Polyester thread
Tools needed
- Sewing needle
- Scissors
- Pencil
Step 1 – Draw the rectangles for the cut
On the fabric, take measurements and draw four rectangles with dimensions 7-inch x 13.5-inch. You need to have two different colored fabric pieces and must draw four rectangles on each fabric piece.
Step 2 – Cut the rectangular drawings
Now cut out all the rectangular drawings with the help of a pair of scissors.
Step 3 – Fold the fabric and stitch
Now take the rectangular piece and, on its longer side, draw a line that is 0.75-inch away from the edge. Next, draw another line that is half an inch away from the edge and do this on every fabric piece. And then draw two more lines in a similar fashion on the other side of the fabric.
Fold this fabric in half and then stitch on both sides of the half-inch line with polyester thread. A sewing machine will be plenty of help here, or you can go for a threading needle as well.
Step 4 – Stitch the other line
With the similar thread stitch in the other line, you can do the stitching several times to make it more resilient.
Step 5 – Partially stitch the third side
You need to partially stitch the third side of your bag by following the steps mentioned above. But don’t stitch all the way and leave a small opening of two inches in the center. You will fill the bag using this opening.
Step 6 – Invert and fill
It’s time to invert your bag and fill it either with corn or resin. Using a funnel will make things a lot easier. Once you are done filling, make sure that the overall weight of your bag is one lb.
Step 7 – Complete the stitching
Now complete the stitching after folding the fabric in front of the seam. And it needs to be a double line away from the end. The finished bags should be 6×6 inches.
Top 5 Do it yourself Cornhole Board Plans
Looking for some inspiration? Our top 5 do it yourself cornhole board plans will help get things sorted out for you.
1. The US flag cornhole board
One way to show your patriotism is to go for US flag design and enjoy the game on the 4th of July. You can always use this design to pay homage to your beloved country on regular days. This plan available here has all the instructions you need.
2. Cornhole board using a pallet
Here’s another idea of how to turn your pallet into some fun cornhole board activity to cherish with your friends and family. This plan is simple to execute and looks charming too.
3. Customized cornhole boards
Looking for a simplistic and rustic design for your cornhole board then this plan is going to help you out a lot. With this design, you are just back to the basics.
4. Cornhole board as a personalized gift
You can make a personalized gift for your loved ones and make cornhole boards for them with a special message written on them. This lovely cornhole board plan is available right here.
5. Lightweight cornhole boards
Want to make lightweight cornhole boards that are easy to collapse and convenient to store? Then go through this easy-to-follow plan and make one your own.
FAQ
How thick should plywood be for a cornhole board?
According to the American Cornhole Association, the plywood needs to be half-inch in thickness. This is the standard recommended size.
What kind of boards do pro cornhole players use?
These boards are made of durable plywood that is 48 inches long and 24 inches wide. It has legs that pop up the higher end up to 12 inches from the ground.
Is wood or aluminum better for cornholes?
If you are a beginner or an intermediate, you can do aluminum cornhole boards. But the Association recommends using cornhole boards that are made of high-quality wood.
What is the best size for cornhole boards?
The official league size of a cornhole board is 24×48 inches, and legs need to raise the top end by 12 inches before the ground below.
Conclusion
Do it yourself cornhole boards are pretty fun. They make your get-together and backyard parties joyful. So, if you are looking for some interesting, friendly rivalry activity in your next backyard gathering or barbecue, then go for a do it yourself cornhole board, and you will enjoy it a lot by keeping everyone busy and competitive.
These do it yourself cornhole boards are simple to make on your own. They will not take much time, and you can conveniently complete your project within a few hours, especially if you have woodworking skills. The best part is, you can customize these boards in different ways.
