DIY dog toys are super helpful for people who have pets at home. The truth is that pet toys are destroyed quickly. If your dog is a bit talented can rip its toy apart from the very first day. The only thing that needs to do is playing with its teeth. When you are buying those toys is like throwing your money out of the window.
However, there are dozen DIY dog toys that you can make with simple items at home. You can craft DIY dog toys easily from unused things in your house, like old T-shirts, towels, jeans, or even bed sheets.
To be honest, toys are necessary if you want to keep your dog happy, active, busy, and out of trouble, but you don’t need to spend tons of money. The only thing you need is creativity and a small amount of time.
Check out below, and you’ll find some genuine ideas for creating DIY dog toys from simple things you have in your home.
DIY Ball & Tug dog toy
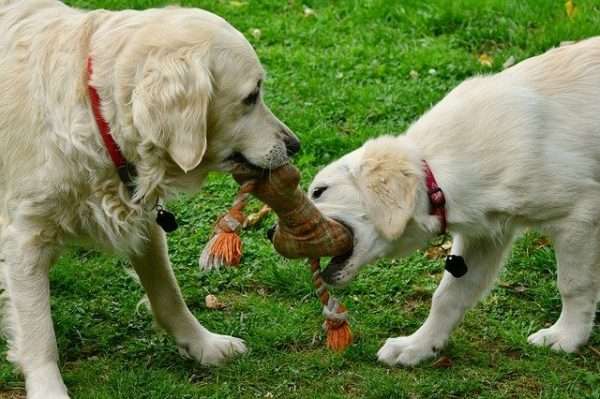
One of the simples DIY dog toys to make is the Ball & Tug toy. This toy will definitely make your dog happy, barking from joy. The best part of the ball & tug toy is that it can be made from things you already have at home.
Why don’t you give it a go?
What you’ll need
- A Tennis ball
- An Old T-shirt
- A ruler or a measuring tape
- A piece of ribbon
- Scissors
Detailed instructions to make your Ball and Tug toy
Step 1
Cut two stripes of the old T-shirt for about 15cm by 35 cm each.
Step 2
Fold the stripes in the middle and place the tennis ball inside.
Step 3
Tie your ribbon as tight as you can around the base of the tennis ball, and then wrap it several times around the fabric.
Step 4
Cut the loose part of your fabric into several stripes, for about 5cm each. At the end of the craft, you need to have a number of strips multiple of three.
Step 5
Then, by using three stripes at a time, braid them into sections and as tight as possible.
Step 6
Tie multiple knots at the end of your braids in order to secure them. A good option is to use stitches instead of knots, as it offers better security. If you wish to secure your toy further, you can use a needle and a thread.
However, a good tip is always to supervise your dog while playing with its toy. There are many small parts to this toy, and it’s wise to take all the required precautions to avoid any accident. One thing is sure, though, your dog will definitely love this DIY pet toy, and it will spend time chewing and madly running with it.
Interactive Feeder
Do you want to make your dog playing while taking its treat? The best essential toy to keep your dog busy is the “interactive feeder.” Make your small friend work to eat its treats and interact with its feeder bowl.
In order to create an interactive feeder, all you need are a PVC pipe and a drill. However, don’t go for it if you are not handy with drills. Before you try and open the holes in the pipe, make sure you have stabilized your pipe; you don’t want it to slip and hurt yourself.
What you’ll need
- A PVC pipe
- A Drill
- Sandpaper
- Caps for both ends of the pipe
Step by Step Guide
Step 1
Take the PVC pipe and cut it to the length that you prefer.
Step 2
With a drill, create some holes across the pipe. Before start drilling, make sure you have stabilized the tube correctly, so it doesn’t slip away with the pressure.
However, be careful not to make the holes too close; you want the food to stay inside. Make it a little difficult for your little friend. Remember that he’ll enjoy it!
Step 3
Then take the sandpaper and sand all the rough edges. It would be best if you always kept your little friend safe and well. Make all the edges smooth. Clean the pipe with water and wash away all the dust.
Step 4
In the end, place the caps at the edges of the pipe. That is the best way to ensure that the treats will stay inside and your little doggy will play for hours.
Now, it’s time to fill the “DIY interactive feeder” with treats and give it to your dog. Enjoy the barking and be ready for a playful mood.
DIY Plastic Water Bottle Crunch
The Water Bottle Crunch is surprisingly a big hit for dogs. It is a common fact that dogs are lovers of noise; that’s why a combination of a plastic vessel filled with something rocky amazes them.
Plastic water bottle crunch is a super easy DIY dog toy to make and save yourself from any type of barking and crying.
What you’ll need
- An empty plastic bottle of water
- Scissors
- Old socks or any type of cloth
- Dry kibble
Guide to create a Plastic Water Bottle Crunch
- Unfold the cap, and cut the ring underneath it.
- . Add some dry kiddle in the bottle to create the sound
- Place the bottle inside the old sock, or fold the cloth around the bottle and shield it.
- Wrap the remaining cloth and cut or braid the hanging fabric. Tie a tight knot with a ribbon, or create a knot with the fabric itself. Make sure that it is tightly tied in order to keep your four-legged friend safe.
You can finish your DIY dog toy like this or create some uneven edges with the scissors to make it a bit fancier. Another option is to go for the candy, tie both the edges and create a candy look.
It’s good to stay proactive and change the bottle regularly, as it gets easily destroyed from the dog’s teeth. Especially, little puppies’ teeth are sharper than usual and can quickly open the first holes on the bottle. In addition, for extra precautions, always keep an eye on the outer cloth; you don’t want to have any accidents.
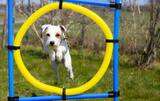
DIY Agility Jumps Dog Toys
Dogs love playing in outer space, and mostly they love active games. One of the more active games is jumping agility bars. Building an agility bar on your own will cost around 40 dollars to buy all the materials.
What you’ll need
- Two ten-inch pieces of 3/4″ PVC pipe (this will make four jump poles)
- Three 10′ pieces of 1″ PVC pipe
- “T” connectors (8 pieces)
- PVC end caps for the first pipe
- Measure
- A cutter suitable for PVC
- Something to mark the pipes with
For this DIY dog toy, you will need to buy or create your own jump cups.
Detailed Guide to Follow
Step 1
Make sure you start with the cutting.
Here are all the cuts you need to make on the first PVC pipe:
- Eight 12″ pieces
- Four 1 3/4″ pieces
- Two 50″ pieces
- Four 30″ pieces
Step 2
The next thing is assembling your agility jumps. If you prefer to create something permanent and secure, add some PVC glue while you are building.
- Slip the 12″ PVC pieces into the top and bottom ends of your “T” connectors in order to the feet. Then add an end cap to every pipe.
- Next, add the one 3/4″ PVC pieces to the open end of the “T” connector. Then add a “T” connector. Make sure they are placed facing outside.
- In the next step, add the 50″ PVC pieces in-between your two “feet.”
- Put your 30 inch PVC pieces into the open “T” connector and then add an end cap to the top of each pipe.
Step 3
Your agility jumps are almost ready, and it is time to add the jump cups to them. If you want to buy them, they usually cost about 19 dollars. However, keep in mind that the jump cups need to be the same length as the first PVC pipe.
Step 4
Measure how much is the distance between the jump cups to determine how long your jump poles need to be. This specific project is 49 3/8″ wide.
Step 5
Out of the 3/4″ PVC pipe, cut four pieces at 49 3/8″. After cutting the jumps, you can paint the poles if you want a specific color. The color is up to you, but make sure it is visible to help your dog during the activity.
Step 6
Let it dry for a whole night, and the DIY agility jumps are ready for use.
That DIY pet toy is such a unique and easy craft, and it will give you and your little friend so much fun.
Dogs are extremely smart, and they need both mental and physical activities to stay healthy and active. Staying stuck at home can lead to frustration and a destructive appetite. But creating DIY dog toys for your little friend will help him burn off excess energy and also provide him with tons of entertainment.
Probably there are many dog toys on the market, but they are pretty expensive. However, doing your own building DIY dog toys will save you some money and allow you to create shapes and sizes suitable for your own pet.
DIY toys that will help fire up your dog’s brain and increase his spirit!
If you love reading this article why don’t you try reading ”A Step by Step Guide To Build A Do It Yourself Lattice Fence” and learn how to keep your small friend safe in the backyard?
